Commons:ジオコーディング
ウィキメディア・コモンズにおいて、ジオコードの割り当てとはメディアに地理的位置情報を付与する慣習を指します。コモンズにあるメディアにジオコードを割り当てるとは、具体的にはそのメディアが記録された地点から緯度経度を採取し、当該のメディアの解説ページに記入するためテンプレート{{Location}} を用いる作業のことです。画像が jpeg 形式の場合、位置情報データは画像のExif に書き込みます。


ジオコードを付与したメディアのカテゴリは、Category:Media with locationsです。
タグがまだない画像の位置座標を調べるには、Category:Location possible。位置座標タグがない画像には、テンプレート {{Location possible}} を記入して位置座標が必要だと示してください。
コモンズのメディアにジオコードを割り当てる[edit]
ジオコードの割り当ては簡単で、手順も多くありません。どの位置座標も en:WGS84 データに対応させる必要があり、各種 GPS システムや Google マップに採用されているからです。印刷物の地図から引用すると、このデータ方式を使っているとは考えられず、誤差が100メートル単位で生じる原因になりかねません。National Grid 照会システムは地域固有のデータ集を採用し、出力結果は正しくなりません。
コモンズではカメラの設置位置をできるだけ正確に記録しています。画像のジオコードはカメラの内部、あるいはコンピュータ内、またはアップロード後に付与できます。個人設定の「ガジェット」タブを開くと、下記にあるツールをいくつか有効にできます。
- Geocoding tools: Adds three geocoding links to the toolbox: recent changes, daily error log, and search. [talk]
- Geocoding To Do: Add a tab to the category linking to the tool allowing to view images that are not geocoded. [talk]
自動処理[edit]
GPS その他の自動処理を使うと、空撮写真に識別が容易なランドマークが見当たらない地域では、非常に有効です。ご利用のカメラに内蔵の GPS 受信機 がある場合 (ほとんどのスマートフォンのカメラ機能に搭載)、作業は自動処理で終わっています。2011年11月より Upload Wizard 機能が投稿画像に書き込まれた GPS データを読み取り、それに適したジオコード用テンプレートを付与するからです。アップロード時に前述のウィザードを使わなかった画像の場合、テンプレートの{{GPS EXIF}} を記入し、コード化をボット作業に依頼してください。
メディアの記録作業中に、外付けの GPS 受信機を使って位置情報を記録するなら、コンピュータ用ソフトウェアを使い、画像ファイルに位置情報を合成します。そのソフトウェアは画像ファイルから時間タグを読み取り、GPS データと照合して緯度経度を取得します。精度を上げるには、カメラの時刻合わせを正確にするか、または時刻のズレを手動で入力します。時刻のズレを監視するには、GPS の表示時刻を画面キャプチャしておきます。エラーの原因が GPS 計測地点がまばらだったためなら、手動で緯度経度を割り出すときのツールが応用できるものの、だいたいの位置情報がわかっているほうが、作業は格段に楽です。
アップロード前にジオコードを付与[edit]
ソフトウェアによってはMicrosoft Pro Photo Tools あるいは darktable のように、利用者が地図から地理的情報を読み取り画像に付与することができます。コモンズの upload wizard もこれらの位置座標タグを認識します。これらのプログラムにはカメラ位置を特定する機能はなく、ほかのプログラムとして Geosetter なら次のメタデータを書き込みます。撮影地点の地理的位置座標、カメラの射角、撮影地点の地名。
もしもご利用のカメラが画像にまったく誤った位置情報をタグ付けしてしまった場合はバッチ処理でデータを除去でき、使うソフトウェアは ExifToolGUI にあります。ここで使う ExifTool は、前述の Geosetter にも同梱されています。
位置座標の取得ツール[edit]
Commons:Locator-tool を使うと、すでにアップロードされた画像にすばやくテンプレートの {{Location}} または {{Object location}} を付与します。画像の一覧を指定してジオコードを付与 (一例としてカテゴリにクエリを走らせる)、地図上に対象物ごとの位置を表示、{{Location}} の付与/もしくは更新を自動で実行。
Manual procedures[edit]
| OSM | scale |
|---|---|
| 19 | unavailable |
| 18 | 1000 |
| 17 | 3000 |
| 16 | 5000 |
| 15 | 10000 |
| 14 | 30000 |
| 13 | 50000 |
| 12 | 100000 |
| 11 | 300000 |
| 10 | 500000 |
| 9 | 1000000 |
| 8 | 2000000 |
| 7 | 3000000 |
| 6 | 5000000 |
| 5 | 10000000 |
| 4 | 30000000 |
| 3 | 50000000 |
The easiest way to identify the location in urban areas is to use an online mapping site with aerial imaging such as:
GeoLocator ツール[edit]
位置座標の取得から正確な位置タグを書く方法の解説:
- 内蔵地図から所在地の位置を探すには(必要によって地図を動かし、拡大縮小し、検索する)
- 所在地に正確に位置マーカを合わせる (所在地にカーソルを置いて [Alt+click]、またはマーカをドラッグする)
- その所在地からのheading (カメラの画角) を合わせる([Shift]キーを押しながらマウスカーソルを移動/[Shift+click])
- 出力された
{{location}}をコピペしてマークアップ(ウィキ文で修正)
既存の位置情報タグをこうしん・修正する手順 (位置の誤差の修正、カメラ画角の追加):
- クエリの窓に既存の位置情報タグをコピーペーストして「適用」 Apply ボタンを押す。タグの解析が終わり、地図上に位置が表示される。
- 位置マーカを動かして、もっと正確な位置へ移す (マーカをドラッグするか、正しい位置にカーソルを置いて[Alt+click])
- その地点から見た画角の調整 (カメラが向いた方向) ([Shift]キーを押しながらマウスを移動/[Shift+click])
- 表示された
{{location}}をコピーしてウィキ文でマークアップして戻す
Bing Maps[edit]
Right click where the exact location is and you have the coordinates. Paste into the Location template.
OpenStreetMap[edit]
- Open a new browser tab/window and load https://www.openstreetmap.org/.
- Search for the correct location; you probably want to zoom in to make this easier.
- Right-click on the exact location the media was recorded. A little pop-up menu opens there. From the pop-up menu, select Show address.
Google Maps[edit]
- Open a new browser tab/window and load https://maps.google.com/.
- Search for the correct location (zoom in, Satellite mode is suggested).
- Right-click on the exact location the media was recorded and select Center map here
- Click the link icon in the left sidebar
- Copy the link in the top box (do not click short url)
- Use the Coordinate conversion helper to insert the coordinates on the image page (add a heading such as "N","SE","NNW")
- Check the page for instructions on installing and using it.
Google Earth[edit]
- If you have Google Earth, a tool for geotagging can be installed: Ald-Hjl-Koord-en.kmz. A crosshair will appear in the middle of the Google Earth screen. Place the crosshair exactly over the camera location by moving the view, and click on it. The location template can be copied from the window that opens. (Please deactivate the tool if unused.)
- If you have coordinates in a KML file (such as created in Google Earth and exported with "Save As" or "Copy", or aided by Picasa), the kmlconvert tool can be used to convert the coordinates to Commons templates. This method is suitable for geocoding a series of images.
See en:Wikipedia:Obtaining geographic coordinates for more information.
Adding a location template[edit]
The use of the following templates is encouraged:
- {{Location}} for camera locations
- {{Object location}} same idea for object instead of camera locations
Do not simply invent your own new templates or copy geocoding templates from other wikis without discussion. Doing so can break the automation that reads and uses the geocoding. Commons geocoding needs are also not the same as those of other projects. Note that you also should not create your own wrappers around {{Location}} or {{Object location}}; this will break the automation as well. Just call one of the templates directly from the image description page.
Simply add {{Location|lat|long}} to the image page, filling in the lat and long from the procedure above. If the image page has an {{Information}} template, or similar, the {{Location}} template should come immediately after it. For example, the result for {{Location|37.51136|-77.602615}} will look like this:
| Camera location | | View all coordinates using: OpenStreetMap |
|---|
Alternatively, to use degrees, minutes and seconds instead of decimal degrees, add {{location|lat deg|lat min|lat sec|NS|long deg|long min|long sec|EW}} to the image page, filling in the lat and long. For example, the result for {{Location|37|30|40.9|N|77|36|9.41|W}} will look like this:
| Camera location | | View all coordinates using: OpenStreetMap |
|---|

Parameters[edit]
Wikipedia geocoding often uses parameters after the coordinates to give more information about the location, but some of them are not useful here.
- type and scale - The defaults are
type:landmark_scale:5000. See above for other values of scale, and the corresponding initial OSM zoom when opened via GeoHack. An explicitly given scale trumps an implicit scale value associated with an also given type. TBD: list of type values and their corresponding scale defaults for commons, dewiki, and enwiki for comparison. - dim - The dim in meters can be used for bigger areas in {{object location}}, e.g.,
type:mountain_dim:2000_scale:10000_region:PL-MA. TBD: document the effect (if any) of dim. - region - If given the region MUST be an ISO 3166-2 code, e.g., US-CA for California. The region can be used for the GeoHack selection of regional map services.
- heading - Used to indicate the direction the camera was pointing at. It is given as degree values 0-360 (clockwise with north as 0) or a compass point abbreviation as defined in w:Boxing the compass. (Example: heading:NW) Compass overlay can be displayed on Google Maps or in Google Earth to help find the correct heading, and the GeoLocator tool allows interactive picking of correct heading on a map as part of metadata authoring.
Precision[edit]
At the moment the named parameter prec=1000 (example) in {{Location}} or {{Object location}} is only used to truncate the displayed coordinates on the page (category, file, or gallery.) The GeoHack map service still gets the full coordinates as specified without indication of the desired precision. The effect depends on the position (see below) and on the display style (decimal ddd.nnnnnn vs. ddd°mm′ss.nnn″), e.g., prec=1000 removes the ss.nnn″ (seconds) display everywhere on earth, while prec=100 only removes .nnn (decimal fractions of seconds.)
The linear measurement of a longitudinal angle varies according to latitude. If we are aiming to a precision of about 0.5–1 m, then it is appropriate to use decimal degrees with 5 decimal places. For the minute/second format, seconds with 1 decimal place will similarly give precision of about 1.5–3 meters of real earth surface. More decimal places have not sense because available maps and navigations are not more precise.
| Latitude | Town | Degree ° | Minute ′ | Second ″ | Decimal Degree at 4 dp |
|---|---|---|---|---|---|
| 60 | Saint Petersburg | 55.65 km | 0.927 km | 15.42 m | 5.56 m |
| 51° 28′ 38″ N | Greenwich | 69.29 km | 1.155 km | 19.24 m | 6.93 m |
| 45 | Bordeaux | 78.7 km | 1.31 km | 21.86 m | 7.87 m |
| 30 | New Orleans | 96.39 km | 1.61 km | 26.77 m | 9.63 m |
| 0 | Quito | 111.3 km | 1.855 km | 30.92 m | 11.13 m |
Note that latitudinal degrees do not vary significantly across the Earth, having a surface precision of 1" = 31 m or 0.0001° = 11 m. See en:Geographic coordinate system for more information.
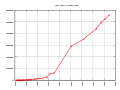
統計[edit]
ジオコードが付与されたファイルの実数は、category:Media with locations を参照。
-
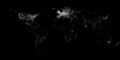
 コモンズの画像でジオコードがあるもの( 2007年3月 - 2010年代半ば)
 -
 ウィキメディア・コモンズにある地理的位置情報が付与された画像(2012年1月21日時点)
 -
 同(2014年2月21日時点)
 -
 同(2015年1月7日)
 -
 同(2007年3月 - 2015年半ば)


(数値データは File_talk:Commons_geocoding_graph.svg を参照)
Use of the information[edit]
Clicking on the coordinates on an image page will lead to a list of various services that can show the location. It is also possible to browse Commons images on a map:
- Geocoded images from Commons plotted in OSM per WikiMap tool (lat/lon/zoom parameters or whole cat possible).
- A mini world map with thumbnails of geocoded images can be found from WikiMiniAtlas on Commons.
- Some geocoded images from Commons plotted in Open Street Map (images tagged with {{Object location}} are not displayed).
Some geocoded images from Commons plotted in Google Maps (images tagged with {{Object location}} are not displayed).– this service is no longer available- KML-file of some geocoded images from Commons for use in Google Earth: GeoCommons (images tagged with {{Object location}} are not displayed).
- In the "gadget" tab of Special:Preferences, there is an option "View category on Google maps". If enabled, this adds a link "map" to all categories. This shows the location of geocoded images in the category on Google maps.
- Adding {{Geogroup}} to a category page adds links to view the images in the category with various maps.
Warnings:
- Services displaying the tagged images (categories, articles etc.) in the map have frequent link failures. Try to click a little later.
- Indexing of the database is often delayed. A new image can appear in the map almost immediately, or after several days or even several weeks or months.
- The number of image-icons displayed in the linked maps is very limited, i.e. the map can display only some of the geocoded images from the displayed area. To display more images of a specific place, you can zoom in or shift to a less crowded area.
- At OpenStreetmap, icons with identical or nearby coordinates cover one another; only the top one is available to be clicked.
Tools providing map outputs:
- Geocommons – creates KML of location templates on Wikimedia Commons, managed by Para
- WIWOSM – displays geometric objects from OpenStreetMap for Wikipedia/Commons articles, managed by Simon04, Retsam, Kolossos
やることリスト[edit]
- コモンズにあり、特定地点に関連するメディアにすべてジオコードを付与する。個人的に熟知した地域はいちばん簡単で、ほかの地域で撮影した画像にも衛星データや他の写真と比較してジオコードを付与する作業は可能。作業対象を探すには、興味のあるカテゴリをまず選び、このツールにカテゴリ名を記入して作動させると、ジオコードが足りない画像をギャラリー表示します。
- {{Location possible}} タグがついた画像の位置座標を取得するには:Category:Location possible を参照。
- 画像のジオコードと、カメラを実際に設置した位置とが異なる場合の修正、あるいは同一地点で撮影した複数画像のジオコードを統一する (
一覧を参照) - ジオコードが間違っているとタグ付けされた画像は、追跡と修正のために Category:Media with erroneous locations をウォッチリストに入れること、さらにジオコードが付与された直後の画像を追跡すること (ギャラリー表示。)
- 位置座標の見出しがない画像を調べて修正 (一覧はこちら。)
- 外部の情報源で、ジオコードがあまり正確ではない場所からインポートされた画像につき、位置座標を確認もしくは修正 (一例として Flickr 画像を参照。)
- 位置座標はあるけれどカメラの見出しがないものに、見出しを追加。
参加者[edit]
関連項目[edit]
- ジオコードの利用者 で MediaWiki:Geocode Users.js を使う人
- Commons:Geocoding/Panorama コモンズのプロジェクト。Wikipedia-POI をパノラマ写真上に重ねる。
- /Overlay コモンズの下位プロジェクト。KML 地図オーバーレイを作成する。
- MediaWiki:Exif-coordinate-format これは画像の EXIF メタデータに埋め込まれた GPS 情報のフォーマットを制御。詳細はこちら。