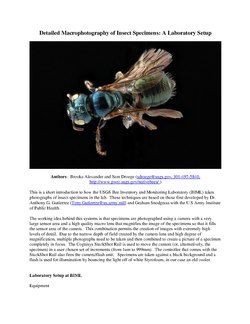
User:Franz van Duns/Focus Stacking
| Userboxes | ||||||||
|---|---|---|---|---|---|---|---|---|
|
Introduction[edit]
I started off with focus stacking sometime in 2012 with trial versions both of Zerene Stacker and Helicon Focus. My main aim was to extend the depth of field in many photographical situations to a far greater extent than simply setting the aperture to minimum diameter, e.g. ap=22, would ever allow. This applies mainly to macro and micro photography.
Refer to this Wiki Commons article which explains some of the details which apply to successful macro and micro photography: Commons:Macro. Refer to this Wikipedia article which provides a general explanation of focus stacking methods, including links to sites which provide greater detail : Focus stacking
Focus Stacking[edit]
My intention is to provide an overview of the various aspects one must pay attention to in order to assure that the individual images of the focus stack are of the best possible quality. All information in the following is based on my personal experience on the subject, and I freely admit that each and every step may be achieved by many other means, depending both on your photographical hardware and software and your personal experience.
!! WORK IN PROGRESS !!
Technical information[edit]
A typical focus stack is based on any number of individual images, ranging from 2 to several hundred. My maximum so far has been 101 images in one focus stack, depicting moss and lichens on the the top of a heavily weathered wooden pole, covering a depth of field of approximately 100mm.
Equipment[edit]
Aperture[edit]
- The optimum aperture values for this camera/lens setup (Sony alpha 7R IV and Sony 2.8/90mm macro lens) are ap=4 to ap=11, with maximum sharpness at ap=8 (tested at infinity).
- The following advice overrules earlier descriptions on this page.
Setup 1[edit]
- (A) Magnification ratio 1:1 and less (infinite) AND (B) manually turning focus of Sony 2.8/90mm macro lens.
- Set aperture to ap=11
- Other values: ap=10 is OK, ap=9 is a bit tight in respect to variations in turning movement, ap=13 causes deterioration due to diffraction.
- This gives enough depth overlap when the inevitable slight maladjustment occurs, manually turning the focus ring to the position for the following image.
- Opening aperture further (ap=8 or wider) may cause rings of slightly blurred areas when not continuing in absolutely exact steps.
Setup 2A[edit]
- (A) Magnification ratio 1:3 and less (infinite) AND (B) let camera+lens (Sony 2.8/90mm macro) reposition automatically on a positioning rail.
- Set aperture to ap=8
- Other values: ap=9 is OK, ap=10 causes deterioration due to diffraction.
- Set repositioning distance / step according to table provided by Zerene Stacker / Novoflex positioning rail, typically 500 microns (0.5 mm) (link will be provided).
- Opening aperture further (ap=7.1 to ap=4) doubles and quadruples the number of images required. But this may improve the rendering of details slightly or may be necessary for some purposes such as stacking in packages (Zerene stacke: slabs) before assembling all packages to the final image.
Setup 2B[edit]
- (A) Magnification ratio 1:1 to 1:3 AND (B) let camera+lens (Sony 2.8/90mm macro) reposition automatically on a positioning rail.
- Set aperture to ap=6.3
- Other values: ap=7.1 is OK, ap=8 is justifiable, ap=9 or higher cause deterioration due to diffraction.
- Set repositioning distance / step according to table provided by Zerene Stacker / Novoflex positioning rail, typically 200 microns (0,2 mm) (link will be provided).
- Opening aperture further: see above.
Setup 3[edit]
- (A) Magnification ratio 1:1 and higher (5:1) AND (B) let camera+lens (Canon MP-E 65mm 1:2.8) reposition automatically on a positioning rail.
- Set aperture to ap=5.6
- Other values: also OK are ap=6.3 and ap=7.1.
- Set repositioning distance / step according to table provided by NGS (see section Links at the end of this article, recommends 650 microns (0,65 mm) at a magnification ratio of 1:1.
Much lower step lengths advised for modern (40Mpixel and more) sensors. I typically set 120 microns (0,12 mm) for 1:1 magnification. - Opening aperture further: see above.
Shutter Speed[edit]
Set shutter speed shorter than 1/20 second.
Shutter speed ideally shorter than 1/20 second, depending on the stiffness of the basis. 1/10th or 1/5th second are sometimes feasable. Slower speeds almost always lead to a slight jitter in a few stack images which noticeably impairs the quality of the final stacked image. On close scrutinising one can detect "blur rings" at the depth corresponding to the impaired source images. I always try to evade. Otherwise either raise the ISO value, improve the illumination or reduce the bias value on the camera body.
Illumination[edit]
!! WORK IN PROGRESS !! Main illumination by indirect sunlight from the window to the left and a styrofoam reflector close to the right. The centre was illuminated from the right by a 6 watt LED spotlight. As the sky was disappointingly drab, a sheet of light blue tinted copy paper had to serve as a neutral background for the white petals.
Tripod / Absolutely Stable Basis[edit]
A sturdy tripod is an absolute necessity. Weight counts! I use a nigh 40-years old steel Gitzo traveller that weighs 3,5 kilogrammes with a sturdy Gitzo 3-way pan/tilt/rotate head. But due to residual camera shake (full focus format with 42 MPixels, i.e. a pixel pitch of approx. 4,5 micrometres, and a 90mm macro lens) this will only suffice for focus stacks down to a magnification of 1:10. Any further magnification and blurring will surely occur.
For higher magnifications (1:5) or more the whole camera/lens setup must be placed on an even sturdier basis. Note: insert image of equipment!. I regularly use blocks of chipboard or similarly rigid materials, sometimes a stool as basis to attain the necessary height.
Subject must not move[edit]
Why RAW-Format?[edit]
Preserve Highlights[edit]
If any important detail is too bright, simply turn down the bias to -1 ap, -2 ap, or even -3 ap before making an image. Just adapt the bias until even the brightest spots are not overexposed. Tip: switch on "zebra striping" within camera to see overexposed highlights, I set the limit to 95%. The JPGs are, of course, too dark, but the RAW files still have enough dynamic reserves in the shades to fully make up for the missing light quanta. This requires "developing" the RAW files via a RAW converter such as Adobe Lightroom, Adobe Camera Raw or any other RAW conversion software that accepts the RAW file format your camera exports.
Three Methods to Incrementally Move Focus Between Images[edit]
(A) My method: manually increase the focus length by incremental steps, starting off with the nearest detail of the object, then moving incrementally outward to the most distant detail that is to be included in the focus stack. I advise taking at least two pictures nearer than the nearest detail and at least two further that the most distant detail, just in case you misjudged distances or in case you moved the camera/lens combination ever so slightly after having made all arrangemnets.
(B) Alternative manual method: place camera/lens combination on a rail and move forward in small increments.
(C) Automate Transistion between Focus Planes: If you have the cash - and the right brand of camera (modern versions of Canon or Nikon bodies) - you can hand the process of imaging to specialized software with which you can control your camera or even to specialized hardware you insert between body and lens(see Helicon Focus). No outlook for anything similar yet for Sony cameras, so it's down to the manual grunt work.
Manually Increasing Focus Length Between Images[edit]
My method: after an image has been taken manually rotate the focus ring of the macro lens by approximately 0.5 mm by means of a custom-made narrow millimetre scale attached to the lens curvature before making the next image. Your lens may require a different turn between images, either larger or even tinier (even the above described 0.5 mm step is quite difficult to set reliably) or by setting a different aperture value, e.g ap=8.
Preparing the Images for Focus Stacking[edit]
For this step I use Adobe Lightroom, but any other image handling tool that can work with 48-bit (3x 16-bit RGB) images will suffice. All images are identically processed by one of my individually defined Adobe Lightroom presets before being handed over to the focus stacking software.
Of course, one can make do with 8-bit JPG images, but any more than minimal processing following the creation of the focus stack will lead to deficiencies in the image such as colour banding which is noticeable especially in areas displaying slight colour transitions, e.g. in the sky.
Using the Focus Stacking Software[edit]
I have purchased Zerene Stacker, but many other software tools will attain similar results.
The built-in procedure is basically: (a) automatically arrange every image to fit in line with either the first image (my preference) or with the image's immediate predecessor, (b) inspect every pixel of every image as to which of the series of images shows most local detail, i.e. more local contrast, in respect to all others, (c) mask off all the areas with less than optimum detail, missing no pixel, (d) take the areas with most details from each image and stuff these into the final image , again without missing a pixel, (e) Display result.
Post Processing[edit]
Mandatory spot removal on the completed focus stack via Adobe Photoshop. Finally crop to required size if necessary.
Worm tracks: Due to the fact that the image size varies within the focus stack sequence, a speck on the sensor will appear a little nearer towards the edge of the image than the previous image
Conclusion[edit]
Focus stacking is manageable but requires great care in all aspects necessary to create a clean series of images for further processing.
Links[edit]
- A 7-page manual with good advice especially for higher magnification ratios (1:1 to 5:1):