Commons:Macro
Macro photography is a really interesting field for Commons, being the best way to provide accurate photographs of small animals, plants, minerals or various other small objects. This page will introduce to you some helpful tips helping to provide better macro photographies. In macro photography, the quality of your images will be according to your material (camera + lens), your stability (camera + subject), the light, and the time of shoot. You can also choose some special setting (ISO, Time, ...), build a macro-studio for better background or light, and eventually make image editing.
| Creation on Commons |
|---|
Materials: digital cameras[edit]
Make macro photographies is highly depending of configuration you have:
- the camera's sensor ;
- the objective (lens).
- a good stability (ex: tripod)
- a good light
Notice that some compact cameras achieve "correct" macro shots for 2cm subject. Bridge cameras can achieve this, too. Therefore, you can do very good macro photography with cameras as inexpensive as 200-400US$. In order to achieve even sharper images with subjects such as small bees (1cm or less), semi-professional cameras ranging between 600 and 2000US$ will be needed.
Some macro pictures from Commons and the camera which provided it:
| Result | Camera | |
|---|---|---|
| ||
| ||
| ||
| ||
-top_01.png)


![...taken with a Canon EOS 40D (about 1,300 US$/1.000 Euro[1])](/wiki/File:Canon_EOS_40D_and_85mmf1.8.jpg)


Important points when shooting[edit]
- Moving or static subjects?

They are two kinds of macro photography:
- when the subject is moving;
- when the subject is stopped.
In most cases, people take macros of insects or small animals. These subjects move continuously, resulting in pictures with annoying blur. Some people thus prefer to shoot death models, or to cold them down so they move into sleeping mode.
- The sun [light]
Lighting is a very important for macros.
- Time
The solution is use a shorter exposure. In most cases, macro shots of insects must be less than 1/200 sec. This means that macros need good light. The more light you have, the less time the shutter will be open, and better your picture will be.
- Focus
In macro, the focus is limited to one layer at a particular distance from your lens. Parts of your subject closer or farther that this will be blurred.
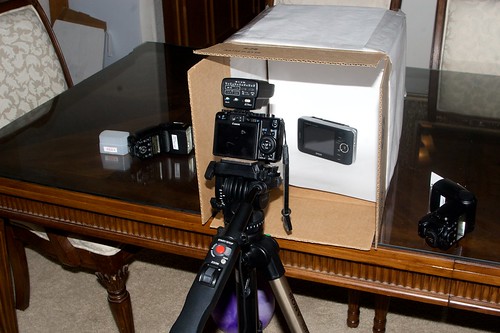
Macro-studio photography / Light Box[edit]

Smart technical macro are especially good for wikipedia, easing recognitions, and providing by few images a [almost] perfect representation of the photographied subject. For such technical macro, some tools are helpful. You may need:
- a correct macro camera;
- a cleaned up background with an accurate scale (Image:Macro A4.svg to print on a white A4 page)
- catch your subject;
- a good sun (that's in fact a really important point!).
- Then, put your subject on the white page, take your picture.
![]() Info Insect tips: Live beetles are easy to shoot. Most other live insects are likely to flee, you need to come closer very slowly. Others are simply too much active to be shot that easily. I personally put such insect in a box, and put the box in the refrigirator (~5°C !). One hour later, the insect [still alive] doesn't move or moves really slowly. I have 2 mins to take my photographies before letting it fly away.
Info Insect tips: Live beetles are easy to shoot. Most other live insects are likely to flee, you need to come closer very slowly. Others are simply too much active to be shot that easily. I personally put such insect in a box, and put the box in the refrigirator (~5°C !). One hour later, the insect [still alive] doesn't move or moves really slowly. I have 2 mins to take my photographies before letting it fly away.
The background provides a scale by small light-blue dots (accordingly, I intentionally kept them). I then improved the light (Gimp), and added a more readable scale (in grey).
See also: Amazon's Photo Arrangement (cleaner Images)
Gallery of tools and examples[edit]
Tools use: Image:Macro A4.svg, Image:Macro scales.svg, Image:Canon PowerShot S5 IS-full.png, an Hogna radiata and a good sun.
-
 1. My A4 printed page for the background
 -
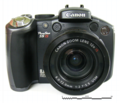 2. My 300€'s camera
 -
 3. (if need): Gimp, Inkscape, and this scales are my tools for image editing
 -
 4. The final product, well named: Hogna_radiata_(AF)-top_01.png (see naming conventions)

Last graphic improvements: light, clean ups and scales[edit]
These tutorials will be using The Gimp and INKSCAPE, two free graphic software largely available. See Commons:Software for download.
| Task | In natural context | On white background (image editing easier) |
|---|---|---|
| Crop and rotate | Crop and rotate are 2 really basic things to do. Start your image editor program such Photoshop, Gimp, or other. Drag and drop your image into it. And look around to first rotate, and then crop your image as you want. That's really easy to do. | |
| Color improvement | In natural context, your light is highly depending of your situation. Accordingly, your image may need a last light improvement. But they are there harder to make. | If your picture is abnormally yellow or blue, etc., it will be need to get a little light improvement, to restore the true white. |
| ||
| Extract the background |
If you take a picture in natural context, wanting to extract the background will probably be a really bad idea which will [in most cases] greatly affect your subject. Extracting the background is always possible, but extracting it AND keep your subject intact will ask hours of pixel-after-pixel image editing. |
In most cases, since the background is already white, this step is not need. If your picture is abnormally yellow or so on, make a "Color improvement" (see upper) will be enough. |
| With natural or white background | With Image:Macro A4.svg as background (provide a scale) | |
| Add the scale |
With a natural background, without scales on your photography, you have to "remember", or to "know" and state the size of your subject. When you know: |
With the white Image:Macro A4.svg when shooting, your picture itself provides the scale. Then :
|
Software[edit]
Naming conventions[edit]
- Draft proposal: fr:Projet:Identification > fr:Wikipédia:Atelier_identification/Nommage_des_photos_d'animaux
Notes[edit]
- ↑ Canon EOS 40D, previewed
- ↑ Canon EOS 40D, previewed
- ↑ Creare your Macro box: Macro @ Photo.net; Photos: Create a Macro Studio Light Box / Tent for Free!; PVC light tent ; My DIY Lightbox
Example of overview: ex. n⁰1 ex. n⁰2; ex. n⁰3; ex. n⁰4;
External links[edit]
- Make a Macrostudio, example of self build Macrostudio.
- Macro @ Photo.net
- Pseudo-tripod for 1 US$, to get more stable.