Category:Bridges in Australia photographed in 2013
Jump to navigation
Jump to search
Subcategories
This category has only the following subcategory.
S
- Sydney Harbour Bridge in 2013 (13 F)
Media in category "Bridges in Australia photographed in 2013"
The following 121 files are in this category, out of 121 total.
-
 18-08-2013,panorama story bridge.jpg 12,304 × 4,372; 9.64 MB
-
 Boorowa Jubilee Bridge 001.JPG 6,016 × 4,000; 11.72 MB
-
 Boorowa Jubilee Bridge 002.JPG 6,016 × 4,000; 11.6 MB
-
 Boorowa Jubilee Bridge 003.JPG 6,016 × 4,000; 9.98 MB
-
 Boorowa Jubilee Bridge 004.JPG 5,480 × 3,640; 7.52 MB
-
 Boorowa Jubilee Bridge 005.JPG 6,016 × 4,000; 8.04 MB
-
 Bridge across Murrumbidgee River, Billilingra Road, Billingra, NSW.JPG 4,320 × 3,240; 2.85 MB
-
 Bridge across the Murrumbidgee River, Tantangara, NSW.JPG 4,320 × 3,240; 4.23 MB
-
 Brisbane CBD and Storey Bridge May 2013.JPG 4,928 × 3,264; 4.57 MB
-
 Broadford Sunday Creek Bridge 001.JPG 6,016 × 4,000; 10.84 MB
-
 Broadford Sunday Creek Causeway 001.JPG 6,016 × 4,000; 10.68 MB
-
 Broadford Sunday Creek Footbridge 001.JPG 6,016 × 4,000; 11.25 MB
-
 Commonwealth Avenue Bridge in fog during May 2013.jpg 4,032 × 3,024; 4.33 MB
-
 Euabalong Bridge 001.JPG 6,016 × 4,000; 10.3 MB
-
 Euabalong Bridge 002.JPG 6,016 × 4,000; 12.19 MB
-
 Euabalong Bridge Plaque.JPG 6,016 × 4,000; 8.7 MB
-
 Eugowra Town Bridge 001.JPG 6,016 × 4,000; 11.04 MB
-
 Eugowra Town Bridge 002.JPG 6,016 × 4,000; 10.75 MB
-
 Eugowra Town Bridge 003.JPG 6,016 × 4,000; 11.86 MB
-
 Eugowra Town Bridge 004.JPG 6,016 × 4,000; 10.99 MB
-
 Eugowra Town Bridge Plaque.JPG 6,016 × 4,000; 7.69 MB
-
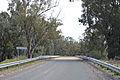
 Forbes Bates Bridge 001.JPG 6,016 × 4,000; 9.58 MB
-
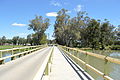 Forbes Bates Bridge 002.JPG 6,016 × 4,000; 9.37 MB
-
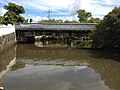
 Forbes Bates Bridge 003.JPG 6,016 × 4,000; 11.38 MB
-
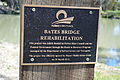 Forbes Bates Bridge Plaque.JPG 6,016 × 4,000; 9.4 MB
-
 Forbes Fitzgerald Bridge 001.JPG 6,016 × 4,000; 10.31 MB
-
 Forbes Fitzgerald Bridge 002.JPG 6,016 × 4,000; 9.56 MB
-
 Forbes Fitzgerald Bridge 003.JPG 6,016 × 4,000; 11.29 MB
-
 Forbes Fitzgerald Bridge 004.JPG 6,016 × 4,000; 9.87 MB
-
 Fox Street Bridge 03.jpg 1,632 × 1,224; 713 KB
-
 Gobarralong Bridge, Murrumbidgee River, New South Wales.JPG 4,320 × 3,240; 3.71 MB
-
 Gundagai Bridges 001.JPG 6,016 × 4,000; 9.32 MB
-
 Gundagai Bridges 002.JPG 6,016 × 4,000; 9.2 MB
-
 Gundagai Murrumbidgee River Rail Bridge 001.JPG 6,016 × 4,000; 9.49 MB
-
 Gundagai Murrumbidgee River Rail Bridge 002.JPG 6,016 × 4,000; 11.23 MB
-
 Gundagai Murrumbidgee River Rail Bridge 003.JPG 5,816 × 3,696; 8.18 MB
-
 Gundagai Prince Alfred Bridge 001.JPG 6,016 × 4,000; 9.51 MB
-
 Gundagai Prince Alfred Bridge 002.JPG 6,016 × 4,000; 7.94 MB
-
 Gundagai Prince Alfred Bridge 003.JPG 5,744 × 3,584; 6.49 MB
-
 Gundagai view from Mount Parnassus 004.JPG 6,016 × 4,000; 8.18 MB
-
 Gundagai view from Rotary Lookout 001.JPG 6,016 × 4,000; 8.35 MB
-
 Gundagai view from Rotary Lookout 002.JPG 6,016 × 4,000; 7.3 MB
-
 Gunning Fish River Bridge 001.JPG 6,016 × 4,000; 7.19 MB
-
 Gunning Fish River Bridge 002.JPG 6,016 × 4,000; 8.01 MB
-
 Kiacatoo Bridge 001.JPG 6,016 × 4,000; 12.01 MB
-
 Kiacatoo Bridge 002.JPG 6,016 × 4,000; 11.61 MB
-
 Kiacatoo Bridge Plaque.JPG 6,016 × 4,000; 9.39 MB
-
 Kiacatoo Old Bridge 001.JPG 6,016 × 4,000; 10.14 MB
-
 Kilcunda Trestle Bridge.jpg 3,264 × 2,448; 2.73 MB
-
 Kurilpa Bridge 01.jpg 3,264 × 2,448; 3.1 MB
-
 Kurilpa Bridge 05.jpg 2,448 × 3,264; 2.91 MB
-
 Kurilpa Bridge 07.jpg 2,448 × 3,264; 2.81 MB
-
 Lachlan River Inglewood Bridge 001.JPG 6,016 × 4,000; 10.23 MB
-
 Lachlan River Inglewood Bridge 002.JPG 6,016 × 4,000; 10.38 MB
-
 Lachlan River Inglewood Bridge 003.JPG 6,016 × 4,000; 9.49 MB
-
 Lachlan River Inglewood Bridge 004.JPG 6,016 × 4,000; 9.84 MB
-
 Lachlan River Inglewood Bridge 005.JPG 6,016 × 4,000; 11.18 MB
-
 Lachlan River Inglewood Bridge 006.JPG 6,016 × 4,000; 9.07 MB
-
 Launching Place Yarra River Bridge 001.JPG 6,016 × 4,000; 10.51 MB
-
 Launching Place Yarra River Bridge 002.JPG 6,016 × 4,000; 10.18 MB
-
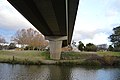
 Melton South Toolern Creek Bridge 001.JPG 6,016 × 4,000; 10.49 MB
-
 Melton South Toolern Creek Bridge 002.JPG 6,016 × 4,000; 10.97 MB
-
 Melton South Toolern Creek Bridge 003.JPG 6,016 × 4,000; 10.84 MB
-
 Melton South Toolern Creek Bridge 004.JPG 6,016 × 4,000; 10.3 MB
-
 Melton South Toolern Creek Bridge 005.JPG 6,016 × 4,000; 9.7 MB
-
 Melton South Toolern Creek Bridge 006.JPG 6,016 × 4,000; 10.38 MB
-
 Melton South Toolern Creek Bridge 007.JPG 5,480 × 3,768; 8.68 MB
-
 Melton South Toolern Creek Bridge 008.JPG 6,016 × 4,000; 11.68 MB
-
 Melton South Toolern Creek Bridge 009.JPG 6,016 × 4,000; 10.95 MB
-
 Morangarell Bland Creek Bridge 001.JPG 6,016 × 4,000; 11.21 MB
-
 Morangarell Bland Creek Bridge 002.JPG 6,016 × 4,000; 11.04 MB
-
 Mundowy Bridge 001.JPG 5,456 × 3,672; 7.81 MB
-
 Mundowy Bridge 002.JPG 5,440 × 3,624; 7.51 MB
-
 Mundowy Bridge 003.JPG 6,016 × 4,000; 9.06 MB
-
 Mundowy Bridge 004.JPG 6,016 × 4,000; 9.02 MB
-
 Mundowy Bridge 005.JPG 6,016 × 4,000; 8.97 MB
-
 Mundowy Bridge 006.JPG 6,016 × 4,000; 9.69 MB
-
 Mundowy Bridge 007.JPG 6,016 × 4,000; 9.94 MB
-
 Mundowy Bridge Approach from North.JPG 5,624 × 3,800; 9.91 MB
-
 Mundowy Bridge Approach from South.JPG 6,016 × 4,000; 10.76 MB
-
 Mundowy Bridge River Name Sign 001.JPG 4,000 × 6,016; 11.88 MB
-
 Mundowy Bridge River Name Sign 002.JPG 6,016 × 4,000; 8.66 MB
-
 Murrin Bridge 001.JPG 6,016 × 4,000; 11.05 MB
-
 Murrin Bridge 002.JPG 6,016 × 4,000; 10.75 MB
-
 Murrin Bridge 003.JPG 6,016 × 4,000; 9.61 MB
-
 Narrandera Tocumwal Railway Line Sturt Highway Overpass.JPG 6,016 × 4,000; 9.52 MB
-
 Narrawa Bridge 001.JPG 6,016 × 4,000; 9.36 MB
-
 Narrawa Bridge 002.JPG 5,752 × 3,704; 8.36 MB
-
 Narrawa Bridge 003.JPG 6,016 × 4,000; 8.81 MB
-
 Noojee Latrobe River Bridge 001.JPG 6,016 × 4,000; 9.19 MB
-
 Noojee Latrobe River Bridge 002.JPG 5,680 × 3,672; 9.38 MB
-
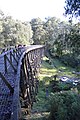
 Noojee Trestle Bridge 001.JPG 6,016 × 4,000; 11.39 MB
-
 Noojee Trestle Bridge 002.JPG 6,016 × 4,000; 10.98 MB
-
 Noojee Trestle Bridge 003.JPG 6,016 × 4,000; 11.32 MB
-
 Noojee Trestle Bridge 004.JPG 6,016 × 4,000; 11.28 MB
-
 Noojee Trestle Bridge 005.JPG 4,000 × 6,016; 11.12 MB
-
 Noojee Trestle Bridge 006.JPG 6,016 × 4,000; 11.47 MB
-
 Noojee Trestle Bridge 007.JPG 6,016 × 4,000; 11.47 MB
-
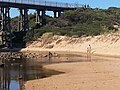 Porters Swimming at Kilcunda Bridge And Beach.jpg 3,264 × 2,448; 1.48 MB
-
 Scrubby Creek crossing Kingston Queensland Australia.jpg 2,048 × 1,536; 2.18 MB
-
 Story bridge panorama sunday 18 august 2013.jpg 9,392 × 3,191; 6.61 MB
-
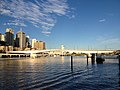 Victoria Bridge, Brisbane 03.jpg 3,264 × 2,448; 3.08 MB
-
 Victoria Bridge, Brisbane 04.jpg 3,264 × 2,448; 3.12 MB
-
 Victoria Bridge, Brisbane 05.jpg 3,264 × 2,448; 2.64 MB
-
 Yass Hume & Railway Bridge 001.JPG 5,608 × 3,696; 6.65 MB
-
 Yass Hume Bridge 001.JPG 6,016 × 4,000; 7.61 MB
-
 Yass Hume Bridge 002.JPG 6,016 × 4,000; 6.79 MB
-
 Yass Hume Bridge 003.JPG 6,016 × 4,000; 8.8 MB
-
 Yass Hume Bridge 004.JPG 6,016 × 4,000; 8.08 MB
-
 Yass Hume Bridge 005.JPG 6,016 × 4,000; 7.46 MB
-
 Yass Hume Bridge 006.JPG 6,016 × 4,000; 7.26 MB
-
 Yass Hume Bridge 007.JPG 6,016 × 4,000; 7.28 MB
-
 Yass Hume Bridge 008.JPG 5,696 × 3,656; 6.59 MB
-
 Yass Hume Bridge Mural 001.JPG 6,016 × 4,000; 8.91 MB
-
 Yass Railway Bridge 001.JPG 5,720 × 3,792; 6.92 MB
-
 Yass Railway Bridge 002.JPG 6,016 × 4,000; 8.05 MB
-
 Yass Railway Bridge 003.JPG 6,016 × 4,000; 7.5 MB
-
 Yass River Railway Bridge 004.JPG 6,016 × 4,000; 8.19 MB
-
 Yass River Railway Bridge 005.JPG 6,016 × 4,000; 7.76 MB
-
 Yass River Railway Bridge 006.JPG 5,728 × 3,592; 9.17 MB
-
 Yass Riverside Park Footbridge 001.JPG 6,016 × 4,000; 10.36 MB


