User:Taxiarchos228/HDR(en)
Due to many requests and inquiries, if I could make a little guidance for creating HDR pictures, I have collected some important points. The purpose of this guide is to show photographers the technical side of this method that are not familiar with it.
Introduction[edit]
Why HDR pictures?[edit]
Sometimes I hear the statement, that HDR images are more artificial than conventional images, but is this correct? Naturally the human eye can adapt to a enormous range and a wide variety of lighting conditions. From dim light at night to the bright midday sun the eye can cover a ratio of 100.000.000:1. To compare: a standard single reflex camera (SLR) has a ratio of 100:1. With an HDR image we try to adjust the technical insufficiency of the camera through a special process to approach the visual impression of the human eye.
Why appear HDR images artificial to some?[edit]

First, it's due to the new technoligy that we are not accustomed to yet which makes such images seem too unusual. Second, the effect is also often exaggerated, and the fine line between purely compensation of the lack of dynamic range and artistic alienation is sometimes not easy, so that certain images look like surreal paintings or appear to be seen through a kind of "X-ray vision". Whether an HDR looks artificial or not depends above all on the algorithm employed.
A little theory[edit]
The amount of light in a lens is determined by the aperture and it shutter speed. Using these two variables you can set the term of the exposure levels (EV) or the light value (LV). The exposure of 0 LV is set to 1 second at aperture f/1.0. Alternatively the light value of 0 LV can be achieved for example by combining the exposure time 2 seconds and the aperture f/1:1.4. This is done by halfing the amount of light passing through the lens which doubles the exposure time. Today's digital SLR cameras often offer up features for correcting the light value. The contrast ratio (CR) is to the power of 2 of the LV:

12 light values thus correspond to a contrast ratio of about 4000:1, because .

The main principle[edit]
The main principle of creating HDR is to make different exposure bracketing captures of one and the same scene and later fuse them together. Therefore you need to have at least one extremely under exposed and one extremely over-exposed picture so that you have on the one hand the outlines of very bright parts and on the other hand a good illumination of the dark parts of the picture. The result should be a balance of bright and dark parts and comply with the natural visual impression.
Gallery[edit]
A small sample of my HDR pictures:
-
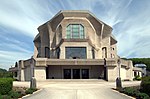 Goetheanum Dornach, Switzerland
 -
 Complex at the olympic stadium in Montréal, Canada
 -
 Canadian Museum of Civilization in Gatineau, Canada
 -
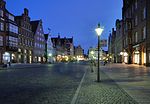 Place "Am Sande" in Lüneburg, Germany
 -
 Interior of Saint Michaels Church in Istein, Germany
 -
 CN Tower in Toronto, Canada
 -
 Eiffel Tower in Paris, France
 -
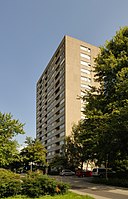 block of flats in Lörrach, Germany


Code of practice[edit]
Technical requirements for HDR[edit]
The basic requirement is a camera where you can set different levels or exposure bracketing. It must not be necessarily an SLR. Also important is a stable tripod. Very simple and light tripods maybe enough when winds are calm, however with stronger wind they are often ineffective. The exposure series has to be with pixel accuracy on top of each other, otherwise you'll get unsightly results or a ruined HDR at worse. By day you can try to make exposure bracketing by steady hand if you have a very fast burst mode in your camera. For this it is advisable to lean on a wall. Though this is a compromise that will never get you the same quality as with a tripod, even if the camera or the lens has an anti-shake-system.
Choice of subject[edit]
In general scenes at day and night both are suitable for marking HDR shots, though it's a technique most commenly used for pictures at night or dusk.
Traditional applications are:
- backlight situations with objects which are throwing shadows
- twilight/ blue hour
- poorly lit interiors with external and/ or different, inhomogeneous light sources such as daylight that shines through windows
What is not suitable for HDR shots?[edit]
In general the subject has to be immovable. Traffic or pedestrians walking by are disturbing the bracket and should be – if they aren't avoidable – in the background of your picture. "Ghosts" are in such cases inevitable in the merged picture.
this should be avoided:
- traffic or pedestrians
- strong movements of flowing waters
- windy weather conditions, also strong moving trees and clouds
Example of creating an HDR[edit]
Creating single shots[edit]
Here I would like to explain step by step the creation of an HDR image. After a nice spot has been chosen to take pictures, a bracket of three images could look like this:
 |
 |
 |
The exact settings of the images can be found in the EXIF file. For a maximum of sharpness, low noise for shots at night or dusk it is highly recommended to choose a low ISO number. This obviously increases the exposure time, which is not a problem if you travel with tripod. A remote control can also be helpful, though this gadget isn't necessary if one is careful when making standard HDR images.
Most important point for the source material is a good dynamic range. This means that the darkest areas have to glow visible and as bright and clear as possible through a long exposure (Image A). This has the consequence that the very bright areas visibly glowing like the green neon sign on the TD Canada Trust Tower in the image above. With image C you have to try to compensate this glow effect as much as possible. Though the neon sign will appear to glow even with 1 second exposure. But in this case the sign is very far away and it would also not have more defined contours with even shorter exposure. However, these are points that you have to try out on site and check the results on the display of your camera. Figure B should be a good balance of both extremes and look normal as a standalone image in an emergency. In general, I expose rather below than above to have more reserves for image processing later on.
In this example I employ only three images, but in my experience (I have tried up to seven pictures) more images are not bringing better HDR results. I recommend to use three single shots.
My favorite software: Tufuse[edit]
There are a number of commercial programs that are either sold as a standalone program or as a plugin to image processing programs. Some of these you can download and try for free for a few weeks. But even freeware can do. One such programm is tufuse. So far it met my needs very satisfactoryily. You can get it here.
A major advantage of this program is based on its sophisticated algorithm that, in my opinion, is merging the single shots very realistically. Many commercial programs disappoint in this regard and produce very artificial results.
Unfortunately the usability of this program has one drawback: it can be only controlled from the command line of a shell. While there is a GUI for the program it does not work without errors, I've tried it some years ago. Perhaps there is a working GUI now, but I got used to the command line interface, so that I personally no longer class this disadvantage as serious. But precisely for this reason, just because the operation is somewhat difficult, I'll talk more about it yet.

- Handling with tufuse

After downloading and unpacking copy the program on the hard disk drive of your computer (e.g. C:/Programes/tufuse). To work with the program, open the Command Shell. In Windows XP you can find this under Accessories/Command Prompt. If you frequently use the program, a link on the desktop would it do easier for you. Then you change the directory in the path directory by typing cd programs/tufuse.
The original images of the bracketing (e.g. A, B and C) have to be copied into this directory. For a testrun you can download my images. The following result will be achieved by the command:
- tufuse -o Result.jpg -a 16 --compression NONE -f -l 9 *.jpg
This fuses the images A, B and C in the file Result.jpg (see right).
- Logic/ syntax of the tufuse-command
In order to start tufuse one needs to specify at least the input files and to appoint the output file. By typing *.jpg the program is using all jpg files in the directory. Alternatively you can list the discrete files (without brackets) you want to use for the fusion. After the command tufuse first the output file has to follow by typing -o Result.jpg. After this you choose the input files. To fuse an image of the files Image1.jpg Image2.jpg Image3.jpg by bringing the result to Result.jpg you have to type tufuse -o Result.jpg Image1.jpg Image2.jpg Image3.jpg
Possible file formats are basically JPG and TIFF.
- Options
But of course you have some options with tufuse. Every addition has to start with typing an - followed by the letter you see in the following list:
| command | denotation |
|---|---|
| -a n | n = 8 or 16, bit depth of the image, it is recommended to use the max value |
| --compression x | typo of compression x = LZW, DEFLATE or NONE (default and recommended) |
| -l n | Specify number of levels to use when performing the pyramid process. Fewer levels shorten the transition region between light and dark areas, but may start to produce visible halos. Experiment to find best results. |
| -p n | n = 1 or 2 (default), number of fusion iterations |
| -b n | Perform auto-bracketing on each input image. Create lighter and/or darker versions of each input image (adjusted by n stops) before performing fusion. If neither "+" nor "-" is specified (e.g. -b 1.5) then both lighter and darker images are created. If "+" is specified (e.g. -b +1.5), then only a lighter version is created. If "-" is specified (e.g. -b -2.0), then only a darker version is created. |
| -w | Blend across -180/+180 boundary (left/right edge of image). Use with 360 degree images where left and right edges of image are continuous. |
| -h | help message |
Photoshop[edit]
Up until version CS4 of Adobe Photoshop HDR images made with this program were very unsatisfactory, the program was difficult to handle up to the point of being unusable. Pictures in the preview were gaudy colorful, but the end result then mouse gray (or vice versa). Minute changes in the not very sensitive controls produced very strong alterations. You had to experiment a lot, because the preview provided entirely false images. Serious work was not possible with this software.
CS5 came with a new HDR-module, which is intuitive to use, offers many settings and consistently delivers excellent results. Using a tripod is not necessary in Photoshop, not all the frames need to be be exactly identical. → See the Quick Start on Wikiversity
-
 failed HDR-result with Photoshop CS4
 -
 HDR with the new HDR-module, bracketing see here


Luminance HDR[edit]
Luminance HDR (former: Qtpfsgui) is a compact graphical interface, which runs under Windows, Linux and Mac OS X. Images can thus be merged and tonemapt as well. Also there are several ways to correct. As input formats JPEG, PNG, PPM, PBM, TIFF (8 bit) are supported. Possible output formats are OpenEXR (EXR), RGBE Radiance (HDR), TIFF (16bit, 32bit float, and LogLuv) RawFormat and PFS (own native format).
Typical mistakes and some hints[edit]

The picture shows a typical error that is often made with daytime pictures of HDR images: Contrast differences are set so high that at the point of light-dark transitions unsightly and unrealistic fringing appears. This error can be avoided by minimizing the brightness extrema of the output images. Night shots seldomly suffer from this or the effect is not that significant.
In general you raise the quality of your HDR images if you follow the advice below:
- Use absolutely shake free pictures by using a tripod and/ or the mirror lock-up.
- Focus clearly on the objects of your picture. This may sometimes mean that you have to turn off the automatic focus and use the manual because especially at night lights can "confuse" the automatic focus.
- A maximum of contrast isn't necessarily a better HDR, here you have to try out in what situation (indoor, outdoor) what contrast is best. No guidance can replace your own experience.
- The number of bracketing pictures does not influence the result. Three images are adequate in my opinion.
- Using the RAW image format will make things easier. First benefit: you can regulate those in the brightness (in JPG it is not possible), second: with just one RAW image you are able to make out an exposure series. This is very useful if you couldn't use a tripod.