Category:Trams in Adelaide
Jump to navigation
Jump to search
history and description of trams in Adelaide, South Australia   | |||||
| Upload media | |||||
| Instance of |
| ||||
|---|---|---|---|---|---|
| Part of | |||||
| Location | Adelaide, South Australia, AUS | ||||
| Operator |
| ||||
| Has part(s) | |||||
| Date of official opening |
| ||||
| official website | |||||
| |||||
Subcategories
This category has the following 4 subcategories, out of 4 total.
Media in category "Trams in Adelaide"
The following 200 files are in this category, out of 209 total.
(previous page) (next page)-
 1918 MTT street tramcar design.png 7,015 × 4,121; 9.54 MB
-
-
 1960 GOING SHOPPING TO THE CITY (2475908352).jpg 2,404 × 1,549; 655 KB
-
 Adelaide (6518213719) (2).jpg 683 × 395; 105 KB
-

-
-
 Adelaide horse tram ca. 1908 (SLSA B-19616-3).jpg 639 × 389; 243 KB
-
 Adelaide horse tram no. 18 at Tramway Museum, St Kilda (background removed).png 4,397 × 6,764; 29.59 MB
-
-
-
 Adelaide MTT tram Type C 186 leaves Shell Street St Kilda (RTHorne 1-3-2009) CNV00083.jpg 3,712 × 2,592; 10.86 MB
-
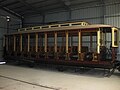
 Adelaide MTT tram Type D 192 in St Kilda museum yard (RTHorne 1-3-2009) CNV00067.jpg 3,683 × 2,455; 3.1 MB
-
 Adelaide MTT tram Type H (small sketch) side elevation.png 896 × 259; 134 KB
-
 Adelaide MTT tram Type H1 381 at St Kilda beach (RTHorne 28-10-2017) IMG 0019.jpg 3,742 × 2,494; 9.88 MB
-

-
 Adelaide Municiap Tramway Trust Club Room(GN01547).jpg 3,264 × 2,448; 995 KB
-
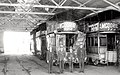
 Adelaide Municipal Tramway Trust Barn(GN01545).jpg 3,264 × 2,448; 1.01 MB
-
 Adelaide Municipal Tramway Trust Club Room(GN01549).jpg 3,264 × 2,448; 1.01 MB
-
 Adelaide Municipal Tramway Trust Lavatories(GN01546).jpg 3,264 × 2,448; 1,017 KB
-
 Adelaide Municipal Tramway Trust Lavatories, Hackney Depot(GN01550).jpg 3,264 × 2,448; 999 KB
-
 Adelaide Municipal Tramway Trust Mess Room, Hackney Depot(GN01551).jpg 3,264 × 2,448; 985 KB
-
 Adelaide Railway Station(GN13501).jpg 3,264 × 2,448; 763 KB
-
 Adelaide tram number 1 on trial run in North Tce 30 Nov 1908.jpg 4,412 × 2,937; 11.71 MB
-
 Adelaide trams of the four main eras -- montage, cropped tight.jpg 3,174 × 994; 2.78 MB
-
 Adelaide trams of the four main eras -- montage, grey surrounds.jpg 3,299 × 1,185; 2.58 MB
-
 Adelaide trams of the four main eras -- montage.png 3,172 × 970; 4.62 MB
-
 Adelaide Type A tram 66 en route to Kilkenny via Croydon ca 1930 (SLSA B 69647).jpg 2,880 × 1,499; 2.33 MB
-

-
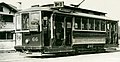
 Adelaide Type A2 tram 42 in St Vincent Street, Port Adelaide, 21 Feb 1919 (SLSA B 5518).jpg 3,015 × 1,644; 1.46 MB
-
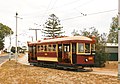
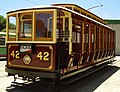 Adelaide type B tram no 42 at Tramway Museum, St Kilda.jpg 1,789 × 1,373; 356 KB
-
-
 Adelaide Type B trams 44 43 & 46 in Victoria Square (SLSA B 22795 cropped).jpg 3,041 × 1,588; 1.02 MB
-
 Adelaide Type C tram 179 in Currie St at King William St 16 Oct 1953.jpg 1,579 × 980; 392 KB
-

-
 Adelaide Type F1 and H trams end elevation (MTT original).png 4,917 × 6,839; 5.77 MB
-
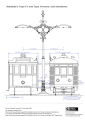 Adelaide Type F1 and H trams end elevation (traced).png 4,888 × 6,877; 4.46 MB
-
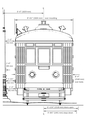 Adelaide Type H tram end elevation (traced).png 2,406 × 3,402; 2.06 MB
-
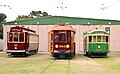 Adelaide types E and H trams and Melbourne W2 class at Tramway Museum, St Kilda.jpg 3,723 × 2,284; 8.13 MB
-
 Aerial photo of Adelaide's Hackney tram depot, Oct 1951.jpg 1,280 × 526; 330 KB
-
 Alstom Citadis 302 segment in storage facility, Madrid, 2009.jpg 1,145 × 1,248; 398 KB
-
 Alstom Citadis 302 tram for Adelaide on Melbourne wharf, 2009.jpg 604 × 494; 113 KB
-
 Alstom Citadis 302 trams in storage, Madrid, 2009.jpg 5,327 × 3,100; 10.09 MB
-
 Bird's-eye view of Glenelg train in Adelaide, 1875.jpg 6,988 × 3,364; 14.52 MB
-
 Bombardier Flexity tram from Glenelg passes SA Supreme Court, King William Street bw.jpg 3,900 × 2,091; 3.49 MB
-
 Bombardier Flexity tram interior during assembly (cropped).jpg 619 × 562; 155 KB
-
 Bombardier Flexity tram interior during assembly.jpg 619 × 827; 201 KB
-
 Bus in street, Colonel Light Gardens(GN12906).jpg 3,264 × 2,448; 865 KB
-
 Centenary Electric Tram(GN10035).jpg 3,264 × 2,448; 998 KB
-
 Cheque Being Handed Over to Tramway Company(GN05604).jpg 3,264 × 2,448; 912 KB
-
 Citadis and Flexity trams cross on North Terrace, Adelaide, 14 Oct 2018 (Henk Graalman).jpg 4,295 × 3,071; 4.29 MB
-

-
 Composite image of 3 Adelaide trams -- horse tram, Type H and Type 200.jpg 6,741 × 2,698; 11.63 MB
-
 Contrast Opposite Reverse Contradict Antipode (2649633503).jpg 1,024 × 768; 384 KB
-

-

-
 Diagram of Municipal Tramways Trust Poles(GN03834).jpg 3,264 × 2,448; 751 KB
-
 Drawing of Glenelg tram line car, proposed, 1909.png 6,978 × 2,849; 3.78 MB
-
 Drawings of Glenelg tram line cars -- proposed 1909 and as built 1929.png 7,015 × 4,960; 14.15 MB
-
 Duncan and Fraser newspaper advert (trams) ca 1910.jpg 5,002 × 3,702; 5.65 MB
-
 E1 111 side profile, March 2009.jpg 2,999 × 1,381; 4.73 MB
-
 Electric Cars opening by Mrs Price, wife of the Premier of South Australia(GN11388).jpg 2,847 × 2,234; 638 KB
-

-
 F1 type tram 282.JPG 1,156 × 718; 423 KB
-
 First tramrun adelaide nov1908.jpg 719 × 445; 169 KB
-

-
 Flexity tram testing switch assemblies at Glengowrie depot, April 2006.jpg 1,600 × 1,200; 2.1 MB
-
 Flooded tram line, Adelaide 1917(GN01958).jpg 3,264 × 2,448; 945 KB
-

-
 Glenelg Railway Co. employees and locomotives at St Leonard's depot, 1881-1899.jpg 2,048 × 1,421; 1.25 MB
-

-
-
 Glenelg train ca 1890, tram 2018 King William Street Adelaide.jpg 4,323 × 5,270; 7.42 MB
-
 Hackney Tram Depot, 1909 (SLSA, B 28639).jpg 1,421 × 1,012; 225 KB
-
 Henley Beach Road, Mile End tram at Fisher Street Crossing(GN01707).jpg 3,264 × 2,448; 922 KB
-
 Holland Street at Southwark (Thebarton), c1916(GN02302).jpg 3,264 × 2,448; 904 KB
-
 Horse tram 79, probably Kensington depot, ca 1909 (SLSA B 11037).jpg 896 × 603; 567 KB
-
 Horse tram and electric tram, North Terrace, Adelaide, 1909 (SLSA B-4364).jpg 1,008 × 697; 415 KB
-

-
 Horse tram and electric trams North Adelaide about 1909 (SLSA B8225).jpg 1,024 × 424; 452 KB
-

-
 Horse tram at depot, Unley (SLSA PRG-280-1-43-312).jpg 933 × 710; 507 KB
-
 Horse tram at intersection of King William Street and Rundle Street ca 1909.jpg 1,014 × 631; 629 KB
-
 Horse tram depot, Mitcham, 1879 -- weekendnotes.com--adelaides-public-transport.jpg 1,835 × 1,146; 2.17 MB
-
 Horse tram Glenelg-Brighton-Marino Tramways ca 1905 (SLSA B 19668).jpg 963 × 674; 464 KB
-

-
 Horse tram to Magill ca 1880 (SLSA B 26075).jpg 680 × 451; 273 KB
-
 Horse tram track and workers, Mitcham, ca 1880 (SLSA B-36052).jpg 951 × 694; 591 KB
-
 Horse trams and carriages, King William Street, Adelaide, ca 1885 (SW Sweet).jpg 2,861 × 1,736; 2.09 MB
-
 Horse trams loading on Wakefield Street Adelaide, ca 1909 (SLSA B-4398).jpg 1,024 × 764; 687 KB
-

-
 Kensington Gardens - Shows Tram(GN11314).jpg 3,264 × 2,448; 866 KB
-
 King William Road, Adelaide, South Australia 1923.jpg 1,030 × 657; 185 KB
-
 King William St – North Tce tram intersection, Adelaide 2018.png 3,507 × 1,121; 851 KB
-
 King William Street looking north(GN09155).jpg 3,264 × 2,448; 852 KB
-
 King William Street looking south from GPO, showing trams(GN10496).jpg 3,264 × 2,448; 971 KB
-
 King William Street looking south from Hindley Street(GN11725).jpg 3,264 × 2,448; 781 KB
-
 King William Street Looking South Showing Carts and Trams(GN08335).jpg 3,264 × 2,448; 950 KB
-
 King William Street Looking South(GN04260).jpg 3,264 × 2,448; 1,003 KB
-
 King William Street showing Automobiles(GN07563).jpg 3,264 × 2,448; 835 KB
-
 King William Street Showing Trams and Victoria Square(GN08545).jpg 3,106 × 2,380; 979 KB
-
 King William Street, Adelaide(GN02744).jpg 3,264 × 2,448; 898 KB
-
 King William Street, Adelaide(GN12812).jpg 3,264 × 2,448; 900 KB
-

-
 Melbourne W2 class tram 294 on line of Tramway Museum, St Kilda (JCRadcliffe).jpg 3,800 × 2,856; 4.88 MB
-
 Melbourne W7 class tram 1013 at St Kilda Playground stop 10 Jun 2013 (JCRadcliffe).jpg 3,276 × 2,488; 5.86 MB
-
 MMMTT Type F1 tram no. 283 (for Hyde Park) at Victoria Square south on 26 Feb 1955.jpg 2,912 × 1,393; 2.86 MB
-

-
 MTT (Adelaide) Type F car 201, new, 17 March 1922 -- (SLSA B-836).jpg 1,013 × 521; 416 KB
-
 MTT Adelaide tram Type A (small sketch) cream bkgrd.jpg 800 × 238; 116 KB
-
 MTT Adelaide tram Type A (small sketch).png 864 × 252; 119 KB
-
 MTT Adelaide tram Type A1 (small sketch) cream bkgrd.jpg 800 × 243; 120 KB
-
 MTT Adelaide tram Type A1 (small sketch).png 879 × 265; 123 KB
-
 MTT Adelaide tram Type A2 (small sketch) cream bkgrd.jpg 800 × 242; 109 KB
-
 MTT Adelaide tram Type A2 (small sketch).png 885 × 264; 116 KB
-
 MTT Adelaide tram Type B (small sketch) cream bkgrd.jpg 800 × 246; 123 KB
-
 MTT Adelaide tram Type B (small sketch).png 867 × 261; 123 KB
-
 MTT Adelaide tram Type C (small sketch) cream bkgrd.jpg 800 × 234; 103 KB
-
 MTT Adelaide tram Type C (small sketch).png 803 × 235; 99 KB
-
 MTT Adelaide tram Type D (small sketch) cream bkgrd.jpg 800 × 234; 128 KB
-
 MTT Adelaide tram Type D (small sketch).png 977 × 277; 158 KB
-
 MTT Adelaide tram Type E (small sketch) cream bkgrd.jpg 800 × 234; 132 KB
-
 MTT Adelaide tram Type E (small sketch).png 1,232 × 356; 202 KB
-
 MTT Adelaide tram Type E1 (small sketch) cream bkgrd.jpg 800 × 235; 125 KB
-
 MTT Adelaide tram Type E1 (small sketch).png 939 × 260; 166 KB
-
 MTT Adelaide tram Type F (side view).png 800 × 275; 175 KB
-
 MTT Adelaide tram Type F (small sketch) cream bkgrd.jpg 800 × 217; 126 KB
-
 MTT Adelaide tram Type F (small sketch).png 997 × 279; 181 KB
-
 MTT Adelaide tram Type G (small sketch) cream bkgrd.jpg 800 × 334; 136 KB
-
 MTT Adelaide tram Type G (small sketch).png 764 × 290; 109 KB
-
 MTT Adelaide tram Type H (small sketch) cream bkgrd.jpg 800 × 216; 123 KB
-
 MTT Adelaide tram Type H (small sketch).png 1,000 × 254; 159 KB
-
 MTT Adelaide tram Type H1 (small sketch) cream bkgrd.jpg 800 × 216; 122 KB
-
 MTT Adelaide tram Type H1 (small sketch).png 1,000 × 264; 169 KB
-
 MTT Hackney tram depot, Adelaide -- Type H and F trams at entrance to 'A' Bay, Dec 1957.jpg 2,878 × 1,748; 1.94 MB
-
 MTT Type A1 tram no. 55 at Victoria Square std rd ca 1917.jpg 991 × 597; 233 KB
-
 MTT Type D tram no. 160, Victoria Square north near Wakefield St, 25 Apr 1956.jpg 1,971 × 1,144; 1.55 MB
-
 MTT Type E1 tram no. 110 at Findon terminus, last day of operation, 18 Oct 1953.jpg 1,943 × 1,140; 1.39 MB
-
 MTT Type F tram no. 227 at Peacock Road near South Terrace, Adelaide, 9 June 1956.jpg 4,014 × 2,566; 4.69 MB
-
 MTT Type F1 tram no. 264 at Peacock Rd nr South Terrace, 9 Nov 1957.jpg 2,884 × 1,660; 2.8 MB
-

-

-
 Municipal Tramways Trust (MTT) crest.png 3,649 × 2,749; 6.05 MB
-
 Municipal Tramways Trust Plans - office depot and workshops, Hackney(GN03841).jpg 3,264 × 2,448; 1.07 MB
-
 North Terrace from Lister House Looking North East(GN08554).jpg 3,264 × 2,448; 976 KB
-
 North Terrace in 1938.jpg 993 × 683; 187 KB
-
 North Terrace in the city showing trams near Kintore Avenue(GN12850A).jpg 3,264 × 2,448; 777 KB
-
 North Terrace Looking East Showing Trams and Automobiles(GN08256).jpg 3,264 × 2,448; 1.03 MB
-
 North Terrace looking east(GN12798).jpg 3,264 × 2,448; 874 KB
-
 North Terrace Looking West Showing Trams and Buses(GN08253).jpg 3,264 × 2,448; 1.07 MB
-
 North Terrace showing trams and automobiles(GN09167).jpg 2,448 × 3,264; 1.03 MB
-
 Partially assembled tram body (MTT Type E), Brill Company, Philadelphia 1910.jpg 5,821 × 2,787; 6.08 MB
-
 Photos of Adelaide's Municipal Tramways Trust inaugural directors and staff, 1909.jpg 1,709 × 1,190; 886 KB
-
 Plan of the metropolitan public street transport system of Adelaide, May 1952.png 4,960 × 7,014; 41.25 MB
-
 Refurbished 300 Series trams 370 and 380, North Tce, Adelaide, January 2009.jpg 1,950 × 1,379; 2.6 MB
-

-

-
-

-
 Simulation of a tram accident - lady next to a tram(GN13864).jpg 3,264 × 2,448; 930 KB
-
 Simulation of tram accident - lady next to the tram(GN13810).jpg 3,264 × 2,448; 738 KB
-
 Simulation of tram accident - lady next to the tram(GN13811).jpg 3,264 × 2,448; 656 KB
-
 Simulation of tram accident - showing lady lying on ground next to tram(GN03562).jpg 3,264 × 2,448; 1.03 MB
-
 Simulation of tram accident - showing lady standing next to tram(GN03561).jpg 3,264 × 2,448; 1.09 MB
-
 Simulation of tram accident - showing lady standing next to tram(GN03564).jpg 3,106 × 2,342; 855 KB
-
 Sketch -- Adelaide 100 Series (Flexity Classic) tram on cream background.jpg 3,341 × 647; 461 KB
-
 Sketch -- Adelaide 100 Series (Flexity Classic) tram.jpg 3,308 × 628; 354 KB
-
 Sketch -- Adelaide 200 Series (Citadis 302) tram.png 815 × 119; 93 KB
-
 Sketch -- Adelaide Citadis 302 on cream background.png 6,743 × 1,149; 1.95 MB
-
 Sketch -- Adelaide Type H tram on cream background.png 5,921 × 2,001; 2.4 MB
-
 Sketch of early Adelaide, c. 1875(GN01245A).jpg 2,894 × 2,136; 1.06 MB
-
 Steam wagon equipped as a tan sprayer(GN13734).jpg 3,264 × 2,448; 952 KB
-
 Street Scene Showing Tram and Automobile(GN09005A).jpg 3,264 × 2,448; 805 KB
-
 Surfacing a road with bitumen(GN13619).jpg 3,264 × 2,448; 920 KB
-
 Sydney R1 class tram 1971 at St Kilda SA Playground stop, 2 Jan 2006 (JCRadcliffe).jpg 2,224 × 1,550; 2.61 MB
-
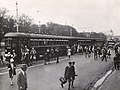
 The opening of the glenelg tram.jpg 459 × 288; 29 KB
-
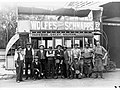
 Three Conductors in Front of Horse Drawn Tram(GN05229).jpg 3,264 × 2,448; 1.01 MB
-
-
 Timeline chart -- Adelaide's tram systems 1878 to 2022.tif 2,308 × 1,285; 11.32 MB
-

-
 Tram and bus at Victoria Square, Adelaide.jpg 4,608 × 3,456; 12.13 MB
-
 Tram carriage decorated for state, electric tram(GN10025).jpg 3,264 × 2,448; 861 KB
-
 Tram Depot at Kensington(GN05351).jpg 3,264 × 2,448; 615 KB
-
 Tram in King William Street in front of Criterion Hotel(GN13731).jpg 3,264 × 2,448; 953 KB
-
 Tram in Victoria Square, Adelaide in 1911.jpg 1,024 × 687; 343 KB
-
 Tram on North Terrace(GN11392).jpg 3,264 × 2,448; 902 KB
-
 Tram on Road Near Saint Peters Cathedral(GN04441).jpg 3,264 × 2,448; 1.16 MB
-
 Tram showing conductors lined up along the side(GN11361).jpg 3,264 × 2,448; 789 KB
-
 Tram staff posing in front of tram - Parkside-Unley-Malvern(GN03216).jpg 3,264 × 2,448; 1.14 MB
-
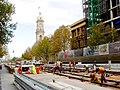 Tram track construction in King William St, near Waymouth St, Adelaide, 20 May 2007.jpg 1,808 × 1,350; 2.07 MB
-
 Tram(GN11963).jpg 3,264 × 2,448; 1.78 MB
-

-
 Trams on King William Street in 1909.jpg 1,024 × 786; 281 KB
-
 Trams over the Torrens, 1914 (14587352320).jpg 1,200 × 829; 177 KB
-
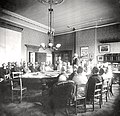
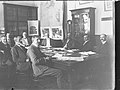 Tramways Trust at Work - Tramway Board Members in Chief Secretary's Room(GN00317A).jpg 3,264 × 2,448; 1.03 MB
-
 Tramways Trust at Work - Tramway Board Members in Chief Secretary's Room(GN00319A).jpg 3,264 × 2,448; 985 KB
-

-

-
 Type H Glenelg tram interior 2005.jpg 1,745 × 1,139; 2.05 MB
-
 Type H tram 364 between Stops 11 and 12, Glenelg line, July 1972.jpg 2,612 × 1,772; 2.5 MB
-
 Unley Road, Unley - Town Planning negatives(GN02295).jpg 3,264 × 2,448; 891 KB

.jpg)
.jpg)
_(2).jpg)
.jpg)
.jpg)
.jpg)
.png)
.jpg)
.jpg)
_CNV00083.jpg)
_CNV00067.jpg)
_IMG_0019.jpg)
.jpg)
.jpg)
.jpg)
.jpg)
.jpg)
.jpg)
.jpg)
.jpg)

.jpg)
.jpg)
.jpg)


.jpg)


.png)
.png)
.png)


.jpg)

.jpg)
.jpg)
.jpg)
.jpg)

.jpg)
.jpg)
.jpg)
.jpg)

_ca_1910.jpg)

.jpg)
.jpg)


.jpg)

.jpg)
_No.1_Converter_Station,_52-60_East_Terrace,_Adelaide,_February_2023.jpg)

,_King_William_Street_terminus,_Adelaide,_1899-1908_(SLSA_B-4397).jpg)
.jpg)

.jpg)
.jpg)
,_c1916(GN02302).jpg)
.jpg)
.jpg)
.jpg)
.jpg)
.jpg)
.jpg)

.jpg)
.jpg)
.jpg)
.jpg)
.jpg)
.jpg)
.jpg)
.jpg)

.jpg)
.jpg)
.jpg)
.jpg)
.jpg)
.jpg)
.jpg)
.jpg)
.jpg)
.jpg)
.jpg)
.jpg)
_at_Victoria_Square_south_on_26_Feb_1955.jpg)
.jpg)
_Type_F_car_201,_new,_17_March_1922_--_(SLSA_B-836).jpg)
_cream_bkgrd.jpg)


.jpg)
_crest.png)
.jpg)
.jpg)

.jpg)
.jpg)
.jpg)
.jpg)
.jpg)
,_Brill_Company,_Philadelphia_1910.jpg)


_tram_303_on_Glenelg_line_level_crossing_over_Greenhill_Road,_Adelaide,_Jun_1978_(Henk_Graalman).jpg)
(GN02540).jpg)
.jpg)
.jpg)
.jpg)
.jpg)
.jpg)
.jpg)
.jpg)
.jpg)
.jpg)
.jpg)
.jpg)
.jpg)
.jpg)

.jpg)
.jpg)
_and_horse_tram,_O%27Connell_and_Ward_Streets_intersection,_North_Adelaide_ca_1909_(SLSA_B8225_cropped).jpg)

.jpg)
.jpg)
.jpg)

.jpg)
.jpg)
.jpg)
.jpg)

.jpg)
.jpg)

.jpg)
.jpg)
.jpg)
.jpg)
,_Currie_Street,_Adelaide_1917_(SLSA_PRG-733-12).jpg)


.jpg)
_side_elevation.png)
_cream_bkgrd.jpg)
.png)
_cream_bkgrd.jpg)
.png)
_cream_bkgrd.jpg)
.png)
_cream_bkgrd.jpg)
.png)
_cream_bkgrd.jpg)
.png)
_cream_bkgrd.jpg)
.png)
_cream_bkgrd.jpg)
.png)
_cream_bkgrd.jpg)
.png)
.png)
_cream_bkgrd.jpg)
.png)
.png)
_cream_bkgrd.jpg)
.png)
_cream_bkgrd.jpg)
.png)
_tram_on_cream_background.jpg)
_tram.jpg)
_tram.png)