User:AtholM/Gallery
Jump to navigation
Jump to search

Unless specifically noted, all photographs are my own work. Most were taken using one or other of my Kodak DC4800, Canon Powershot A60, Canon Powershot A95 or Canon EOS 40D.
Both of the Canon compact cameras died from the same known fault way after warranty ran out. Canon Australia fixed both and sent them back for free. Yes, that influenced my decision to buy a Canon DSLR.
Images marked (scanned) were scanned from prints of photos I took using a 35mm camera.
Cars, car components and tools
[edit]-
 Autogas tank valves
 -
 Autogas fuel filler
 -
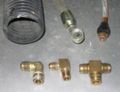 Autogas lines and fittings
 -
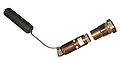
 Autogas Sherwood valves
 -
 Autogas tank in boot of sedan
 -
 1958 Buchanan Cobra awaiting restoration (scanned)
 -
 Engine bay of Ford Falcon AU E-Gas vehicle
 -
 Fuel filler of Ford Falcon E-Gas wagon
 -
 Side of a car that has been "keyed" (scratched deliberately by a vandal)
 -
 Autogas mixer with variable venturi held open
 -
 Autogas carburettor
 -
 Fill and AFL valves from autogas tank
 -
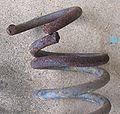 Oxy-cut suspension spring showing loss of tempering in adjacent turn


Places & Roads
[edit]-
 ABC Shop in Charlestown
 -
 The village of Bylong, New South Wales
 -
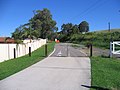
 The railway level crossing and turnoff to Mudgee via Wollar, just north of the village of Bylong
 -
 Bylong Valley Way near Cox's Gap and railway line, looking west towards gravel road surface
 -
 Former Food For Less site in Cardiff
 -
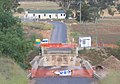
 Core sampling at Newcastle link road on F3 freeway
 -
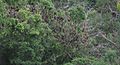 Flying fox colony in Blackbutt Reserve
 -
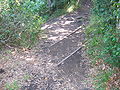
 The Yuelarbah Track near Glenrock Lagoon, where the track passes through an old coal railway cutting
 -
 Remnants of an old coal railway line on the Yuelarbah Track near Glenrock Lagoon
 -
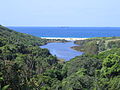 Looking east across Glenrock Lagoon from Leichhardt's Lookout on the Yuelarbah Track
 -
 Looking west along the Golden Highway towards the Bylong Valley Way intersection, with Sandy Hollow in the distance
 -
 The Golden Highway direction sign at the end of the Bylong Valley Way
 -
 Goulburn River bridge on Bylong Valley Way near Sandy Hollow
 -
 Twin bridges of Hume Highway over Greenhills Road
 -
 Kirk's Bridge on Bylong Valley Way and Baerami community hall
 -
 Kirk's Bridge on Bylong Valley Way at Baerami after new concrete sections were completed
 -
 Kirk's Bridge on Bylong Valley Way at Baerami after timber section was demolished
 -
 Newcastle link road bridge over F3 freeway
 -
Core Sampling alongside F3 Freeway at Newcastle Link Road in preparation for F3 to Branxton link road
-
 Camp Road Greta underpass and deviation for Hunter Expressway
 -
 The Golden Highway and New England Highway direction signs at their intersection
 -
 Old Kirk's Bridge on Bylong Valley Way at Baerami
 -
 Phipps Cutting Picnic Area on Bylong Valley Way at edge of Wollemi National Park
 -
 Single lane bridge across Widden Creek on Bylong Valley Way
 -
 Typical unsealed section of Wombeyan Caves Road
 -
 Plaque on tunnel on Wombeyan Caves Road
 -
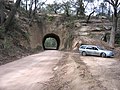 Tunnel on Wombeyan Caves Road


Railways
[edit]-
 Adamstown railway station disused platform viewed from bridge
 -
 Adamstown railway station viewed from bridge
 -
 Adamstown railway station looking north over ends of platforms and level crossing towards Broadmeadow yard. Viewed from bridge
 -
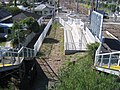 Adamstown railway station showing wheelchair ramp built over disused line. Viewed from bridge
 -
 Awaba railway station viewed from bridge
 -
 Awaba railway station viewed from road
 -
 Disused Belmont line looking towards former junction near Adamstown railway station
 -
 Branxton railway station viewed from bridge between platforms
 -
 Broadmeadow railway station viewed from road bridge
 -
 Broadmeadow railway yard and ARTC Central Traffic Control viewed from road bridge
 -
 Cardiff railway station
 -
 Civic Railway station viewed from Merewether Street level crossing
 -
 Civic Railway station facade viewed from road
 -
 Civic Railway station looking east from footbridge
 -
 Civic Railway station looking west from footbridge
 -
 Civic Railway station up platform extension
 -
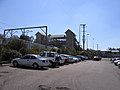 Fassifern railway station viewed from carpark
 -
 Fassifern railway station viewed from Fassifern Road bridge
 -
 Disused Toronto branch platform at Fassifern railway station
 -
 Looking south along Fernleigh Track from near Adamstown railway station
 -
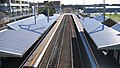
 Kotara railway station viewed from bridge
 -
 Looking south over Morisset rail yard, with the station in the distance and maintainance trains on a siding
 -
 Morisset railway station viewed from overbridge
 -
 Morisset railway station viewed from carpark
 -
 Muswellbrook railway station viewed from the street
 -
 Muswellbrook railway station platform
 -
 Muswellbrook railway yard and station viewed from the Bell Street bridge
 -
 Rail bridge carrying Ulan (Sandy Hollow to Gulgong) line over Bylong Valley Way near Cox's Gap
 -
 Richmond Vale Railway tunnel #3 eastern portal
 -
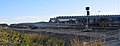 Sandgate railway overpass, with Kooragang bound coal train passing underneath
 -
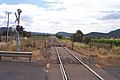
 Level crossing where Ulan line crosses Bylong Valley Way near Sandy Hollow
 -
 Looking east along Ulan line from level crossing on Bylong Valley Way near Sandy Hollow, showing rear end of train waiting on crossing loop
 -
 Looking west along Ulan line towards Sandy Hollow from level crossing on Bylong Valley Way
 -
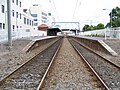
 Singleton railway station viewed from across the tracks
 -
 Singleton railway station viewed from the street
 -
 Toronto railway line cycleway at end of Narara St Fassifern looking east. Overgrown railway line and Fennell Bay in background
 -
 Toronto railway line at end of Narara St Fassifern looking north along line with cycleway in background
 -
 Toronto railway station
 -
 Ulan railway line branching off main line at Muswellbrook
 -
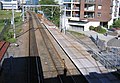 Wickham railway station down platform extension viewed from footbridge
 -
 Wickham railway station viewed from footbridge
 -
 Wickham railway station viewed from Stuart Avenue level crossing


Random objects
[edit]-
 An electric carving knife
