Commons:Tutorial for Audio file editors
Introduction
[edit]This document provides a step-by-step guide for how to produce good quality audio files. It assumes you have installed the free audio editing software Audacity. This guide was written using Audacity 1.3.8 beta on Mac OS X but most versions of Audacity should be able to do what is described here.
The audio format used in Wikimedia Commons is Ogg Vorbis which uses lossy-compressed PCM audio. For compatability you should generate Ogg files with a maximum sample rate of 44.1kHz and a bit depth of 16bit.
To achieve the best quality results you should make the initial recording in the best possible quality, make any required edits or apply effects to the audio and then reduce the quality to that which will be uploaded to Wikimedia Commons. A good approach is to make recordings and edit at 96kHz / 24bit and then generate an Ogg file at 44.1kHz / 16bit.
Make the initial recording
[edit]- Audacity can be used to make the recording if you have a suitable audio input device, such as a USB microphone or USB audio interface with a line in.

- Alternatively you can make the recording on separate digital recording hardware and open the resulting file in Audacity.
Note: Audacity by default will use a bit depth of 32bit even if the original file is of a lower bit depth so the value shown on the left of the edit window is not an indication of the bit depth of the original audio file. However, the actual sample rate is shown in Audacity's lower right corner.
Trim audio
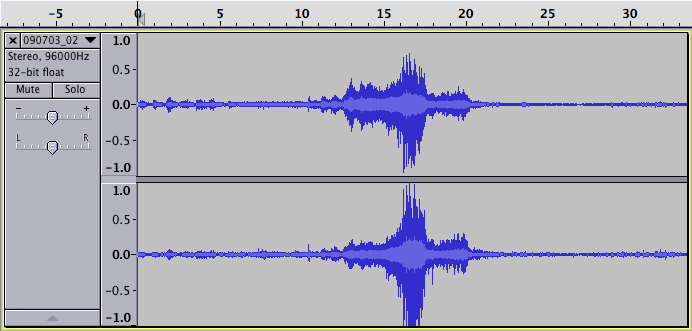
[edit]Zoom in or out to a level where you can see the audio waveform for the section that you are interested in. For example, here is what three Matra racecars recorded at 96kHz / 24bit look like when the audio file is opened up in Audacity:
In this tutorial we will focus on the first car so that the resulting ogg vorbis file will only contain the material we are interested in. The remainder of the audio will be discarded so it's a good idea to keep a copy of the original. First we zoom roughly around the first peaked area so that more detail in the audio waveform is visualised but we can still see a greater period than what we want to extract.
Now let's find the point where the bit that we're interested in starts by clicking on the waveform and clicking 'Play' (or pressing the spacebar). When it is found we will select from the start of the file to that point by choosing Edit -> Select -> Track Start To Cursor
Now by pressing the backspace key or choosing Edit -> Delete the selected area will be removed and our audio will start at exactly the right point.
Our audio file has had its start trimmed and now we need to do the same for the end. Select the point at which the audio should finish then choose Edit -> Select -> Cursor to Track End. Delete the selected section to leave only the audio we are interested in, as shown below.
Normalise
[edit]In order to make the audio as loud as possible without it distorting it is necessary to normalise it. If this is not done then the resulting audio may be unnecessarily quiet. To do this make sure nothing is selected (click 'Skip to Start' to cancel a selection) then choose Effect -> Amplify.
We want to amplify such that the 'New Peak Amplitude' is just below 0.0dB. By default it should automatically select amplification to achieve a new peak amplitude of 0dB so just move the slider one notch to the left which in the above screenshot achieves a new peak amplitude of -0.3dB. If 0dB were used this could create problems when downsampling or encoding into ogg vorbis.
Because we are editing high resolution (bit depth) audio these amplification (gain) changes have a negligible impact on sound quality. It is important to make any necessary gain changes before reducing the bit depth.
Optional: Fade in & out
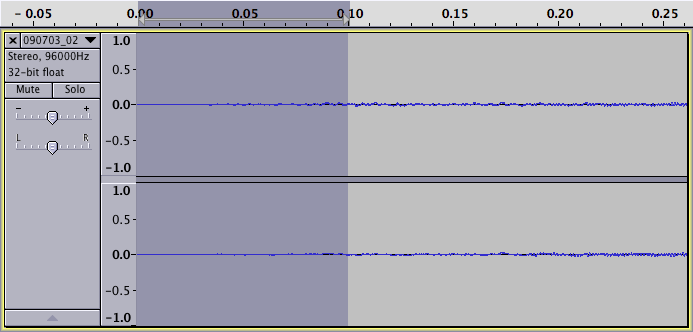
[edit]Fading in at the start of the audio clip, and fading out at the end, can eliminate pops and clicks as the audio starts and stops. This is a bit like rounding off sharp edges and it can make a huge difference even if the fade is as brief as a tenth of a second. For example, if the recording was made in a windy environment there may be low frequency background noise that is not easily heard once the audio is playing, but when the audio starts the abrupt change in amplitude is heard as an unpleasant click. In the screenshot below we have zoomed in at the start of the audio, selected the first 0.1 seconds and applied Effect -> Fade In. A similar approach can be used at the end of the audio to fade out.
Optional: Save archive-quality file
[edit]Once the editing is complete it is a good idea to keep a high quality version for archiving (local storage space permitting). First make sure the Project Rate in the bottom-left of the Audacity window (shown in this screenshot) matches the sample rate or the original audio file. For the above example this should be 96000 Hz. Choose File -> Export and in the file save dialog choose a Format of 'Other uncompressed files'. Click 'Options' and choose an appropriate format. For the above example this could be a 24bit WAV or 24bit AIFF etc.
Add metadata
[edit]Choose File -> Open Metadata Editor... and fill out the empty fields. The comments field can be used to convey the creative commons license associated with the file. Ideally the audio editing software should tag up the audio file automatically to reflect the chosen license but I don't believe there is a free audio editor available that does this.
Save Ogg Vorbis file
[edit]Change the Project Rate in the lower left corner to 44100Hz. Choose File -> Export, select a Format of 'Ogg Vorbis Files', click 'Options' and choose a quality level. A quality of 6 produces an Ogg Vorbis file at 192kbps. For the example 21 second audio clip this produces a 436KB file.
Example media
[edit]Audio media related to this guide.


