Category:Railway photographs taken on 2023-07-27
Jump to navigation
Jump to search
| Railway photographs of the previous week | · | Railway photographs of the previous day | ← | 2023-07-27 | → | Railway photographs of the next day | · | Railway photographs of the next week |
| 20 | · | 21 | · | 22 | · | 23 | · | 24 | · | 25 | · | 26 | · | 27 | · | 28 | · | 29 | · | 30 | · | 31 | · | 1 | · | 2 | · | 3 |

Railway photographs taken on July 27, 2023.
Files or subcategories can be added here using a direct categorization tag. Image files can be categorized here also automatically using {{Taken on}} template.
Media in category "Railway photographs taken on 2023-07-27"
The following 120 files are in this category, out of 120 total.
-
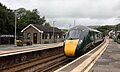
 2023 at Lostwithiel station - from the level crossing.JPG 1,366 × 910; 605 KB
-
 2023 at Lostwithiel station - offices.JPG 1,366 × 910; 637 KB
-
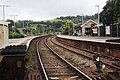
 2023 at Lostwithiel station - platform 1.JPG 1,366 × 820; 652 KB
-
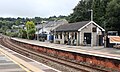
 2023 at Lostwithiel station - platform 2 waiting shelter.JPG 1,366 × 1,024; 226 KB
-
 2023 at Lostwithiel station - platform 2.JPG 1,366 × 910; 161 KB
-
 2023 at Lostwithiel station - platform 3.JPG 1,366 × 910; 219 KB
-
 2023 at Lostwithiel station - signal 3 and viaduct.JPG 1,381 × 1,036; 627 KB
-
 2023 at Lostwithiel station - signal 4 and 9.JPG 1,037 × 1,382; 655 KB
-
 2023 at Lostwithiel station - signal 47.JPG 1,382 × 922; 1,006 KB
-
 2023 at Lostwithiel station - signal 49 and 8.jpg 1,028 × 1,370; 544 KB
-
 2023 at Lostwithiel station - signal 5 and 6 off.JPG 1,382 × 1,037; 832 KB
-
 2023 at Lostwithiel station - signal 5.JPG 1,037 × 1,382; 623 KB
-
 2023 at Lostwithiel station - signal 52.JPG 1,371 × 914; 668 KB
-
 2023 at Lostwithiel station - signal 54 and 57.JPG 1,037 × 1,382; 846 KB
-
 2023 at Lostwithiel station - signal 58 face.JPG 1,030 × 1,372; 566 KB
-
 2023 at Lostwithiel station - signal 58 rear.JPG 1,025 × 1,367; 760 KB
-
 2023 at Lostwithiel station - signal 7 and 6.JPG 1,038 × 1,384; 746 KB
-
 2023 at Lostwithiel station - signal box east.JPG 1,373 × 1,030; 663 KB
-
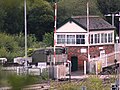
 2023 at Lostwithiel station - signal box front.JPG 1,382 × 922; 539 KB
-
 2023 at Lostwithiel station - signal box rear.JPG 1,382 × 922; 519 KB
-
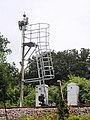
 2023 at Lostwithiel station - site of ground frame.JPG 1,382 × 922; 1.09 MB
-
 2023 at Middleway Crossing.JPG 1,366 × 910; 573 KB
-
 2023 at Par Bridge Crossing.JPG 1,366 × 910; 678 KB
-
 2023 at Par Signal Box.JPG 1,366 × 1,024; 613 KB
-
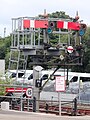
 2023 at Par station - resignaling work.JPG 1,366 × 922; 757 KB
-
 2023 at Par station - signal 16.JPG 1,366 × 1,024; 715 KB
-
 2023 at Par station - signal 3 and 7 (rear).JPG 1,024 × 1,366; 980 KB
-
 2023 at Par station - signal 4.JPG 1,024 × 1,366; 551 KB
-
 2023 at Par station - signal 47.JPG 1,024 × 1,366; 746 KB
-
 2023 at Par station - signal 49.JPG 1,366 × 910; 698 KB
-
 2023 at Par station - signal 5, 8 and 26.JPG 1,024 × 1,366; 709 KB
-
 2023 at Par station - signal 52 and 24.JPG 1,024 × 1,366; 520 KB
-
 2023 at Par station - signal 54 and 21.JPG 1,024 × 1,366; 708 KB
-
 2023 at Par station - signal 55 and 50 plus 35 (rear).JPG 1,024 × 1,366; 495 KB
-
 2023 at Par station - signal locking at crossover 33.JPG 1,366 × 820; 784 KB
-
 2023 at Par station - trap points 23.JPG 1,366 × 1,024; 1.11 MB
-
 2023 at St Blazey - signal 2 and 9.JPG 1,366 × 910; 597 KB
-
 2023 at St Blazey - signal 36.JPG 1,366 × 910; 453 KB
-
 2023 at St Blazey - signal 40.JPG 1,033 × 1,377; 528 KB
-
 2023 at St Blazey Bridge Crossing.JPG 1,382 × 922; 441 KB
-
 812 028 SK-ZSSK Nove Zamky.jpg 5,217 × 3,478; 5.76 MB
-
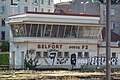
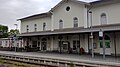
 Belfort station 2023 1.jpg 5,472 × 3,648; 6.42 MB
-
 Belfort station 2023 2.jpg 5,472 × 3,648; 6.21 MB
-
 Belfort station 2023 3.jpg 5,472 × 3,648; 5.91 MB
-
 Belfort station 2023 4.jpg 5,472 × 3,648; 7.4 MB
-
 Belfort station 2023 5.jpg 5,472 × 3,648; 6.55 MB
-
 Belfort station 2023 6.jpg 5,472 × 3,648; 7.87 MB
-
 CDA 375001 end detail.JPG 1,024 × 1,366; 481 KB
-
 CDA 375037 branding detail.JPG 1,366 × 910; 358 KB
-
 CDA 375044 never repainted.JPG 1,366 × 820; 371 KB
-
 CDA 375045 end detail.JPG 1,366 × 1,024; 512 KB
-
 CDA 375058 at St Blazey.JPG 1,366 × 820; 503 KB
-
 Colmar SNCF 427031 (FRET) (53075356316).jpg 6,048 × 4,024; 18.24 MB
-
 Colmar TER-SNCF 76608 (53076158188).jpg 6,048 × 3,402; 10.98 MB
-
 Deggendorf hauptbahnhof (2023)-1.jpg 4,608 × 2,592; 3.25 MB
-
 Deggendorf hauptbahnhof (2023).jpg 4,608 × 2,592; 3.7 MB
-
 Freising bahnhof (2023)-1.jpg 4,608 × 2,592; 4.05 MB
-
 Freising bahnhof (2023)-2.jpg 4,608 × 2,592; 3.86 MB
-
 Freising bahnhof (2023).jpg 4,608 × 2,592; 4.4 MB
-
 GWR 802003 (835003) leading bogie revised fittings.JPG 2,732 × 1,820; 1.58 MB
-
 GWR Mark 3 TGS 49106 at Plymouth.JPG 1,382 × 820; 454 KB
-
 GWR Mark 3 TS 48117 at Plymouth.JPG 1,366 × 820; 438 KB
-
 GWR Mark 3 TS 48118 at Plymouth.JPG 1,366 × 820; 426 KB
-
 GWR Mark 3 TS 48141 at Par.JPG 1,366 × 820; 417 KB
-
 GWR Mark 3 TS 48149 at Plymouth.JPG 1,366 × 820; 430 KB
-
 Ireji-STA Platform.jpg 5,203 × 3,468; 12.24 MB
-
 Ireji-STA Waiting-room.jpg 5,472 × 3,648; 9.08 MB
-
 Ireji-STA.jpg 5,296 × 3,530; 12.04 MB
-
 JIA NAACO 33 70 089 4 012-0 end detail.JPG 1,366 × 910; 476 KB
-
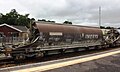 JIA NAACO 33 70 089 4 017-9 at Par.JPG 1,366 × 820; 368 KB
-
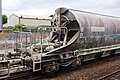
 JIA NAACO 33 70 089 4 025-2 at Par.JPG 1,366 × 820; 430 KB
-
 JIA NAACO 33 70 089 4 025-2 end detail.JPG 1,366 × 910; 414 KB
-
 Joban-Line Series-E657 EH500-53.jpg 3,813 × 2,543; 5.99 MB
-
 JRE Iwaki-STA Concourse.jpg 5,384 × 3,589; 9.82 MB
-
 JRE Iwaki-STA Free-passage.jpg 5,333 × 3,556; 8.25 MB
-
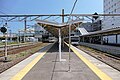
 JRE Iwaki-STA Platform1-2.jpg 5,472 × 3,648; 10.12 MB
-
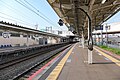
 JRE Iwaki-STA Platform3-4.jpg 5,472 × 3,648; 10.65 MB
-
 JRE Iwaki-STA Platform5-6.jpg 5,472 × 3,648; 10.42 MB
-
 JRE Iwaki-STA Platforms.jpg 5,472 × 3,648; 11.67 MB
-
 JRE Iwaki-STA South-bus-rotary.jpg 5,378 × 3,585; 11.26 MB
-
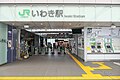
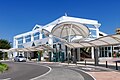
 JRE Iwaki-STA South-Entrance.jpg 5,168 × 3,445; 9.37 MB
-
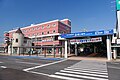
 JRE Iwaki-STA South.jpg 5,211 × 3,474; 10.74 MB
-
 JRE Iwaki-STA Ticket-gate.jpg 5,472 × 3,648; 8.93 MB
-
 JRE Kanda-STA North-Gate.jpg 5,472 × 3,648; 9.76 MB
-
 JRE Kanda-STA South-Gate.jpg 5,472 × 3,648; 9.34 MB
-
 JRE Kanda-STA South-Ticket.jpg 5,472 × 3,648; 9.32 MB
-
 JRE Ryugasakishi-STA East.jpg 5,472 × 3,648; 9.41 MB
-
 JRE Ryugasakishi-STA Gate.jpg 5,472 × 3,648; 10.55 MB
-
 JRE Ryugasakishi-STA Platforms.jpg 5,384 × 3,589; 11.64 MB
-
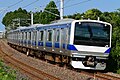 JRE Series-E531 K553.jpg 3,849 × 2,566; 6.45 MB
-
 JRE Tokai-STA West.jpg 5,049 × 3,366; 10.91 MB
-
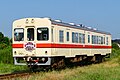 Kanto-Railway Kiha532 123rd-anniversary.jpg 3,596 × 2,397; 4.44 MB
-
 Kanto-Railway Kiha532 Inside.jpg 5,472 × 3,648; 8.99 MB
-
 Kanto-Railway Kiha532 Left-Cab.jpg 4,863 × 3,241; 8.22 MB
-
 Kanto-Railway Kiha532 Right-Cab.jpg 4,936 × 3,291; 8.44 MB
-
 Lincoln Service Outbound from Chicago.jpg 3,872 × 2,592; 1.64 MB
-
 Lostwithiel - GWR 158748 Plymouth service.JPG 1,366 × 910; 735 KB
-
 Lostwithiel - GWR 43162-43094 down train.JPG 1,366 × 910; 787 KB
-
 Lostwithiel - GWR 800311 Paddington train.JPG 1,366 × 910; 688 KB
-
 Lostwithiel - GWR 802003 Plymouth service.JPG 1,366 × 820; 480 KB
-
 Lostwithiel - GWR 802012 down service.JPG 1,366 × 820; 469 KB
-
 Lostwithiel Viaduct - GWR 802013 Paddington train.JPG 1,366 × 910; 629 KB
-
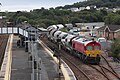 Par - DB Cargo 66104 china clay to Exeter.JPG 1,366 × 910; 638 KB
-
 Par - GWR 43092-43154 Penzance to Plymouth.JPG 1,366 × 1,024; 528 KB
-
 Par - GWR 43154-43092 Plymouth to Penzance.JPG 1,366 × 910; 599 KB
-
 Par - GWR 802108 and DB Cargo 66104.JPG 1,366 × 820; 433 KB
-
 Par Viaduct and Harbour branch (2023).JPG 1,366 × 910; 691 KB
-
 Paris Gare de Lyon 2023 2.jpg 5,472 × 3,648; 7.6 MB
-
 Plattling bahnhof (2023)-1.jpg 4,608 × 2,592; 3.62 MB
-
 Plattling bahnhof (2023).jpg 4,608 × 2,592; 3.13 MB
-
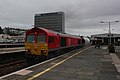 Plymouth - DB Cargo 66104 china clay to Exeter.JPG 1,366 × 910; 405 KB
-
 Plymouth - GWR 150221 Gunnislake service.JPG 1,366 × 910; 539 KB
-
 Plymouth - GWR 43187 and 150221.JPG 1,366 × 910; 487 KB
-
 Plymouth - GWR 43187 Penzance service.JPG 1,366 × 910; 433 KB
-
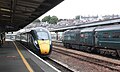 Plymouth - GWR 802004 and 43027.JPG 1,366 × 820; 491 KB
-
 Sanuki-STA Entrance.jpg 5,472 × 3,648; 9.61 MB
-
 Sanuki-STA Gate.jpg 5,472 × 3,648; 9.67 MB
-
 Sanuki-STA Platform.jpg 5,324 × 3,549; 9.78 MB
-
 St Blazey - GWR 150265 crossing the river.JPG 1,366 × 1,024; 879 KB
-
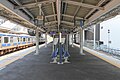
 Yokohama municipal subway Kamiooka station platform 202307271330.jpg 4,032 × 3,024; 4.87 MB


.JPG)


.JPG)


_(53075356316).jpg)
.jpg)
-1.jpg)
.jpg)
-1.jpg)
-2.jpg)
.jpg)
_leading_bogie_revised_fittings.JPG)


.JPG)

-1.jpg)
.jpg)


