Category:Rail transport related photographs by Bidgee sponsored by Wikimedia Australia (second large grant)
Jump to navigation
Jump to search
Media in category "Rail transport related photographs by Bidgee sponsored by Wikimedia Australia (second large grant)"
The following 58 files are in this category, out of 58 total.
-
 42103 passing Wagga Wagga railway station.jpg 2,000 × 1,334; 3 MB
-
 5917 on the Main Southern line at Bomen (1).jpg 2,000 × 1,333; 2.13 MB
-
 5917 on the Main Southern line at Bomen (2).jpg 2,000 × 1,333; 2.5 MB
-
 5917 on the Main Southern line at Bomen (3).jpg 2,000 × 1,333; 2.63 MB
-
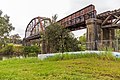
 Albury Wodonga Rail Bridge, looking towards New South Wales from the Victorian side (1).jpg 2,000 × 1,333; 3.26 MB
-
 Albury Wodonga Rail Bridge, looking towards New South Wales from the Victorian side (2).jpg 2,000 × 1,333; 2.65 MB
-
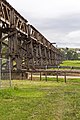
 Albury Wodonga Rail Bridge, looking towards New South Wales from the Victorian side (3).jpg 2,000 × 1,333; 2.75 MB
-
 Albury Wodonga Rail Bridge, looking towards New South Wales from the Victorian side (4).jpg 2,000 × 1,333; 2.65 MB
-
 Albury Wodonga Rail Bridge, looking towards New South Wales from the Victorian side (5).jpg 2,000 × 1,334; 2.92 MB
-
 Albury Wodonga Rail Bridge, looking towards New South Wales from the Victorian side.jpg 2,000 × 1,333; 2.8 MB
-

-

-
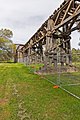
 Former North East line rail bridge over Flanagans Creek on Gateway Island (3).jpg 1,333 × 2,000; 3.43 MB
-
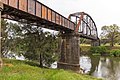
 Former North East line rail bridge over Flanagans Creek on Gateway Island.jpg 2,000 × 1,333; 2.96 MB
-
 Former Wodonga Railway Station and goods shed at Junction Square in Wodonga.jpg 2,000 × 1,333; 2.16 MB
-
 Former Wodonga Railway Station at Junction Square in Wodonga (1).jpg 2,000 × 1,333; 2.4 MB
-
 Former Wodonga Railway Station at Junction Square in Wodonga (2).jpg 2,000 × 1,333; 3.17 MB
-
 Former Wodonga Railway Station at Junction Square in Wodonga.jpg 2,000 × 1,334; 2.42 MB
-
 Hamilton Station in October 2018.jpg 3,000 × 2,000; 7.41 MB
-
 Kiama Railway Station.jpg 2,000 × 1,333; 2.36 MB
-
 Looking north down the South Coast line at Coalcliff Station (1).jpg 2,000 × 1,333; 2.68 MB
-
 Looking north down the South Coast line at Coalcliff Station (2).jpg 2,000 × 1,333; 2.65 MB
-
 Looking north down the South Coast line at Coalcliff Station (3).jpg 2,000 × 1,333; 2.41 MB
-
 Looking north down the South Coast line at Coalcliff Station.jpg 2,000 × 1,333; 2.45 MB
-
 Looking south down the South Coast line at Coalcliff Station (1).jpg 2,000 × 1,333; 2.27 MB
-
 Looking south down the South Coast line at Coalcliff Station (2).jpg 2,000 × 1,334; 2.49 MB
-
 Looking south down the South Coast line at Coalcliff Station (3).jpg 2,000 × 1,333; 2.35 MB
-
 Looking south down the South Coast line at Coalcliff Station (4).jpg 2,000 × 1,333; 2.76 MB
-
 Looking south down the South Coast line at Coalcliff Station.jpg 2,000 × 1,333; 2.57 MB
-
 Maitland Railway Station in October 2019.jpg 3,000 × 2,000; 6.19 MB
-
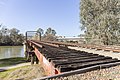
 Murrumbidgee River Railway Bridge over the Murrumbidgee River in Gundagai (1).jpg 3,000 × 2,000; 7.36 MB
-
 Murrumbidgee River Railway Bridge over the Murrumbidgee River in Gundagai (2).jpg 2,000 × 3,000; 6.95 MB
-
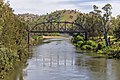
 Murrumbidgee River Railway Bridge over the Murrumbidgee River in Gundagai.jpg 3,000 × 2,000; 7.63 MB
-
-
-

-

-
-
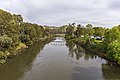
 Murrumbidgee River Railway Bridge over the Murrumbidgee River viewed in South Gundagai.jpg 3,000 × 2,000; 6.37 MB
-
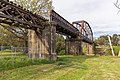
 Murrumbidgee River Railway Bridge Viaduct in Gundagai (1).jpg 2,000 × 3,000; 7.4 MB
-
 Murrumbidgee River Railway Bridge Viaduct in Gundagai (2).jpg 2,000 × 3,000; 7.4 MB
-
 Murrumbidgee River Railway Bridge Viaduct in Gundagai (3).jpg 3,000 × 2,000; 6.17 MB
-
 Murrumbidgee River Railway Bridge Viaduct in Gundagai.jpg 3,000 × 2,000; 7.77 MB
-
 Murrumbidgee River Railway Bridge Viaduct in South Gundagai (1).jpg 3,000 × 2,000; 8.64 MB
-
 Murrumbidgee River Railway Bridge Viaduct in South Gundagai.jpg 3,000 × 2,000; 8.7 MB
-
 Murrumbidgee River Railway Bridge Viaduct over Middleton Drive in Gundagai (1).jpg 2,000 × 3,000; 4.83 MB
-
 Murrumbidgee River Railway Bridge Viaduct over Middleton Drive in Gundagai.jpg 2,000 × 3,000; 5.5 MB
-
 Murrumbidgee River Railway Bridge Viaduct over Morleys Creek in Gundagai (1).jpg 2,000 × 3,000; 7.97 MB
-
 Murrumbidgee River Railway Bridge Viaduct over Morleys Creek in Gundagai (2).jpg 3,000 × 2,000; 7.33 MB
-
 Murrumbidgee River Railway Bridge Viaduct over Morleys Creek in Gundagai (3).jpg 3,000 × 2,000; 7.91 MB
-
 Murrumbidgee River Railway Bridge Viaduct over Morleys Creek in Gundagai.jpg 3,000 × 2,000; 7.19 MB
-
 Murrumbidgee River Railway Bridge Viaduct over Oibell Drive in Gundagai (1).jpg 3,000 × 2,000; 7.02 MB
-
 Murrumbidgee River Railway Bridge Viaduct over Oibell Drive in Gundagai.jpg 3,000 × 2,000; 6.39 MB
-
 NSWGR 3801 approaching the Fernleigh Road level crossing (4).jpg 3,000 × 2,000; 5.8 MB
-
 Rail Motor Society NTC 721 and NPF 621 at Wagga Wagga Railway Station.jpg 3,000 × 2,000; 6.37 MB
-
 Segovia-Guiomar railway station.jpg 2,000 × 1,333; 2.61 MB
-
 Urbos 3 at the Alinga Street light rail stop (1).jpg 3,000 × 2,000; 4.89 MB
-
 Urbos 3 at the Alinga Street light rail stop.jpg 3,000 × 2,000; 5.21 MB

.jpg)
.jpg)
.jpg)
.jpg)
.jpg)
.jpg)
.jpg)
.jpg)

.jpg)

.jpg)


.jpg)
.jpg)


.jpg)
.jpg)
.jpg)

.jpg)
.jpg)
.jpg)
.jpg)


.jpg)
.jpg)

.jpg)
.jpg)

.jpg)
.jpg)

.jpg)
.jpg)
.jpg)

.jpg)

.jpg)

.jpg)
.jpg)
.jpg)

.jpg)

.jpg)


.jpg)
