Category:Kingsway Tunnel approach, Liverpool
Jump to navigation
Jump to search
| Object location | | View all coordinates using: OpenStreetMap |
|---|
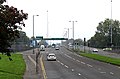
There are four routes associated with the Liverpool approach to Kingsway Tunnel; entrances and exits northbound and southbound on Scotland Road. All carry two lanes of traffic.
Media in category "Kingsway Tunnel approach, Liverpool"
The following 17 files are in this category, out of 17 total.
-
 Above Kingsway Tunnel August 17 2010.jpg 3,072 × 2,304; 1.21 MB
-
 Cazneau Street stub.jpg 4,620 × 3,249; 10.96 MB
-
 Entrance road to Wallasey Tunnel, Liverpool.JPG 1,280 × 960; 574 KB
-
 Kings Way, July 17 2010 (1).jpg 3,072 × 2,304; 1.21 MB
-
 Kingsway Tunnel approach from Scotland Road.jpg 5,009 × 3,086; 17.92 MB
-
 Kingsway Tunnel approach, Liverpool 1.jpg 4,613 × 2,863; 5.32 MB
-
 Kingsway Tunnel approach, Liverpool 2.jpg 4,726 × 3,564; 8.33 MB
-
 Kingsway Tunnel approach, Liverpool 2a.jpg 4,998 × 3,606; 7.92 MB
-
 Kingsway Tunnel approach, Liverpool 3.jpg 4,518 × 3,522; 7.77 MB
-
 Kingsway Tunnel approach, Liverpool 4.jpg 4,766 × 3,538; 6.55 MB
-
 Kingsway Tunnel approach, Liverpool 5.jpg 4,739 × 3,560; 6.79 MB
-
 Kingsway Tunnel approach, Liverpool 6.jpg 4,482 × 3,582; 7.1 MB
-
 Kingsway Tunnel approach, Liverpool from above.jpg 4,905 × 3,321; 21.05 MB
-
 Kingsway Tunnel, July 17 2010 (2).jpg 2,304 × 3,072; 1.13 MB
-
 Limekiln Lane bridge, Liverpool 3.jpg 4,983 × 3,226; 17.36 MB
-
 Limekiln Lane bridge, Liverpool 4.jpg 4,785 × 3,449; 18.94 MB
-
 Towards Scotland Road.jpg 5,096 × 3,368; 6.9 MB


.jpg)


.jpg)


