Category:Interior of the Operations and Checkout Building
Jump to navigation
Jump to search
Subcategories
This category has the following 5 subcategories, out of 5 total.
A
R
- Radiological Control Center (10 F)
Media in category "Interior of the Operations and Checkout Building"
The following 200 files are in this category, out of 503 total.
(previous page) (next page)-
 Apollo 1 - Chaffee in Apollo Block I space suit.jpg 607 × 848; 114 KB
-
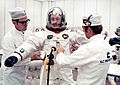
 Apollo 1 Grissom suiting operations.jpg 3,647 × 4,603; 2.89 MB
-
 Astronaut Virgil I. Grissom dons his helmet.jpg 630 × 851; 103 KB
-
 The Apollo 204 crew is suited for an altitude chamber test.jpg 985 × 1,172; 180 KB
-
 Apollo Spacecraft 012 Command-Service Module moved for mating.jpg 2,367 × 3,000; 819 KB
-
 Transfer of Apollo Spacecraft 012 CSM.jpg 2,411 × 3,000; 807 KB
-
 Apollo 1 CM undergoes final checkout at KSC 1.4.67.jpg 985 × 1,513; 205 KB
-
 67-H-1230 Lunar module LTA-2 R.jpg 2,913 × 2,273; 845 KB
-

-
 S68-17301.jpg 6,591 × 8,239; 6.8 MB
-
 KSC-95EC-0904.jpg 404 × 600; 54 KB
-
 2010 Space Conference group portrait.jpg 2,274 × 1,373; 1.59 MB
-
 Obama leaves Kennedy Space Center - 201004150007HQ.jpg 3,483 × 2,554; 750 KB
-
 Barack Obama speaking about space flight - 201004150004HQ.jpg 2,556 × 3,574; 1.34 MB
-
 Buzz Aldrin and Barack Obama.jpg 2,149 × 1,433; 1.02 MB
-
 368539main mp-suit full.jpg 2,008 × 3,000; 513 KB
-
 A crane lowers the main parachute for installation on the Orion spacecraft.jpg 3,000 × 2,000; 4.27 MB
-
 A2 CM cleanroom integration.jpg 6,245 × 4,430; 16.9 MB
-
 Abashidze (cropped).jpg 861 × 1,149; 100 KB
-
 Al Shepard suiting up.jpg 966 × 1,697; 630 KB
-
 Alan Shepard during Apollo 14 suiting up.jpg 799 × 998; 176 KB
-
 Alan Shepard suiting up for Apollo 14 mission.jpg 1,384 × 2,048; 863 KB
-
 Albert Sacco in his space suit.jpg 725 × 773; 139 KB
-
 Ap13-70-H-496HR.jpg 2,244 × 2,835; 892 KB
-
 Ap14-KSC-71PC-85.jpg 610 × 900; 178 KB
-
 Apollo 11 Command and Service Modules prior to mating with SLA (48234631026).jpg 3,150 × 3,919; 6.12 MB
-
 Apollo 11 CSM being moved from its work stand for mating.jpg 1,185 × 1,468; 425 KB
-
 Apollo 11 CSM being readied for mating to Saturn V (48274971197).jpg 5,470 × 4,220; 14.5 MB
-
 Apollo 11 CSM moved for mating to spacecraft adapter (S69-32370).jpg 3,680 × 4,702; 3.43 MB
-
 Apollo 11 Lunar Module being moved for mating to rocket (S69-32396).jpg 6,556 × 8,271; 7.97 MB
-
 Apollo 11 Lunar Module being moved for mating to SLA (48257871372).jpg 2,622 × 3,308; 5.99 MB
-
 Apollo 11 Lunar Module prior to inspection (S69-19644).jpg 4,064 × 4,064; 2.79 MB
-
 Apollo 11 Preparations - GPN-2000-000959.jpg 2,335 × 3,000; 4.3 MB
-
 Apollo 13 Haise suits up.jpg 3,173 × 4,653; 2.57 MB
-
 Apollo 14 Roosa suits up.jpg 2,042 × 3,000; 6.12 MB
-
 Apollo 16 Astronauts Inspect Lunar Rover - GPN-2000-001858.jpg 3,000 × 3,000; 5.84 MB
-
 Apollo 16 crew suiting up on launch day.jpg 2,502 × 1,644; 636 KB
-
 Apollo 17 Astronaut Training - GPN-2000-000640.jpg 2,400 × 3,000; 1.69 MB
-

-

-
 Artemis II - European Service Module on Work Stand (KSC-20211020-PH-GEB01 0004).jpg 6,720 × 4,480; 22.42 MB
-
 Artemis II - European Service Module on Work Stand.jpg 4,105 × 5,976; 15.47 MB
-
 Artemis II Astronaut Family Tour of IOZ (KSC-20240315-PH-ILW01 0005).jpg 8,192 × 5,464; 32.12 MB
-
 Artemis II Astronaut Family Tour of IOZ (KSC-20240315-PH-ILW01 0046).jpg 6,720 × 4,480; 23.62 MB
-
 Artemis II Astronaut Family Tour of IOZ (KSC-20240315-PH-ILW01 0055).jpg 6,720 × 4,480; 22.44 MB
-
 Artemis II Astronaut Family Tour of IOZ (KSC-20240315-PH-ILW01 0058).jpg 4,480 × 6,720; 20.4 MB
-
 Artemis II Crew Module (KSC-20211105-PH-KLS01 0022).jpg 6,720 × 4,480; 18.86 MB
-
 Artemis II Crew Module (KSC-20211105-PH-KLS01 0034).jpg 6,720 × 4,480; 18.65 MB
-
 Artemis II Crew with EGS (KSC-20230807-PH-KLS01 0470).jpg 6,720 × 4,480; 19.06 MB
-
 Artemis II Crew with EGS (KSC-20230807-PH-KLS01 0487).jpg 6,720 × 4,480; 20.16 MB
-
 Artemis II Crew with EGS (KSC-20230807-PH-KLS01 0511).jpg 6,720 × 4,480; 20.21 MB
-
 Artemis II Crew with EGS (KSC-20230807-PH-KLS01 0518).jpg 6,720 × 4,480; 19.77 MB
-
 Artemis II European Service Module (KSC-20230113-PH-NAS01 0001).jpeg 5,472 × 3,072; 5.46 MB
-
 Artemis II European Service Module (KSC-20230113-PH-NAS01 0002).jpeg 5,472 × 3,072; 5.63 MB
-
 Artemis II European Service Module (KSC-20230113-PH-NAS01 0003).jpeg 3,072 × 5,472; 5.48 MB
-
 Artemis II European Service Module (KSC-20230114-PH-NAS01 0001).jpeg 2,736 × 1,536; 2.6 MB
-
 Artemis II European Service Module (KSC-20230114-PH-NAS01 0002).jpeg 2,736 × 1,536; 2.06 MB
-
 Artemis II European Service Module (KSC-20230116-PH-NAS01 0001).jpeg 2,736 × 1,536; 2.99 MB
-
 Artemis II European Service Module (KSC-20230116-PH-NAS01 0002).jpeg 2,400 × 1,344; 1.51 MB
-
 Artemis II European Service Module (KSC-20230116-PH-NAS01 0003).jpeg 2,400 × 1,344; 1.31 MB
-
 Artemis II Flight Hardware (KSC-20220120-PH-FMX01 0063).jpg 7,896 × 5,464; 26.62 MB
-
 Artemis II Heat Shield Installation (KSC-20230622-PH-CSH01 0012).jpg 6,720 × 4,480; 19.94 MB
-
 Artemis II Heat Shield Installation (KSC-20230622-PH-CSH01 0013).jpg 6,720 × 4,480; 20.95 MB
-
 Artemis II Heat Shield Installation (KSC-20230622-PH-CSH01 0019).jpg 6,720 × 4,480; 19.33 MB
-
 Artemis II Heat Shield.jpg 6,720 × 4,071; 16.08 MB
-
 Artemis II Orion Crew Module at KSC (jsc2022e046255).jpg 6,720 × 4,480; 4.97 MB
-
 Artemis II Orion Crew Module at KSC (jsc2022e046256).jpg 6,720 × 4,480; 4.91 MB
-
 Artemis II Orion Hardware (KSC-20220606-PH-KLS01 0015 ).jpg 6,720 × 4,480; 19.39 MB
-
 ARTEMIS II ORION.jpg 1,280 × 853; 188 KB
-
 Artemis II Service Module in O&C Highbay Clean Room (KSC-20220112-PH-CSH01 0004).jpg 5,760 × 3,840; 14.77 MB
-
 Artemis II Service Module in O&C Highbay Clean Room (KSC-20220112-PH-CSH01 0005).jpg 3,673 × 5,748; 14.3 MB
-
 Artemis II SM Move to Fast Cell (KSC-20230522-PH-AMS01 0001).jpg 3,648 × 5,472; 8.4 MB
-
 Artemis II SM Move to Fast Cell (KSC-20230522-PH-AMS01 0002).jpg 5,472 × 3,648; 8.87 MB
-
 Artemis II SM Move to Fast Cell (KSC-20230522-PH-AMS01 0003).jpg 5,054 × 3,103; 6.99 MB
-
 Artemis II SM Move to Fast Cell (KSC-20230522-PH-AMS01 0004).jpg 3,648 × 5,472; 7.82 MB
-
 Artemis II SM Move to Fast Cell (KSC-20230522-PH-AMS01 0005).jpg 3,920 × 3,382; 6.15 MB
-
 Artemis II SM Move to Fast Cell (KSC-20230522-PH-AMS01 0006).jpg 5,472 × 3,648; 8.47 MB
-
 Artemis II SM Move to Fast Cell (KSC-20230522-PH-AMS01 0007).jpg 3,648 × 5,472; 8.05 MB
-
 Artemis II SM Move to Fast Cell (KSC-20230522-PH-AMS01 0008).jpg 5,472 × 3,648; 8.7 MB
-
 Artemis II SM Move to Fast Cell (KSC-20230522-PH-AMS01 0009).jpg 5,472 × 3,648; 8.13 MB
-
 Artemis II SM Move to Fast Cell (KSC-20230522-PH-AMS01 0010).jpg 3,648 × 5,472; 7.76 MB
-
 Artemis II SM Move to Fast Cell (KSC-20230522-PH-AMS01 0011).jpg 4,404 × 3,452; 7.62 MB
-
 Artemis II SM Move to Fast Cell (KSC-20230522-PH-AMS01 0012).jpg 5,472 × 3,648; 8.9 MB
-
 Artemis II SM Move to Fast Cell (KSC-20230522-PH-AMS01 0013).jpg 5,472 × 3,648; 8.63 MB
-
 Artemis II SM Move to Fast Cell (KSC-20230522-PH-AMS01 0014).jpg 5,472 × 3,648; 8.96 MB
-
 Artemis II SM Move to Fast Cell (KSC-20230522-PH-AMS01 0015).jpg 4,552 × 2,898; 6.43 MB
-
 Artemis III crew module (jsc2022e046222).jpg 8,368 × 5,579; 11.75 MB
-
 Artemis III crew module (jsc2022e046223).jpg 8,368 × 5,579; 12.73 MB
-
 Artemis III crew module (jsc2022e046230).jpg 8,368 × 5,579; 13.07 MB
-
 Artemis III ESM-3 Uncrated in O&C (KSC-20240904-PH-FMX01 0021).jpg 8,192 × 5,464; 10.09 MB
-
 Artemis III Flight Hardware, CM and CMA (KSC-20220120-PH-FMX01 0001).jpg 8,192 × 5,464; 33.54 MB
-
 Artemis III Flight Hardware, CM and CMA (KSC-20220120-PH-FMX01 0006).jpg 8,192 × 5,464; 32.84 MB
-
 Artemis III Flight Hardware, CM and CMA (KSC-20220120-PH-FMX01 0016).jpg 8,192 × 5,464; 29.78 MB
-
 Artemis III Flight Hardware, CM and CMA (KSC-20220120-PH-FMX01 0044).jpg 8,192 × 5,464; 34.73 MB
-
 Artemis III Orion Crew Module (KSC-20230622-PH-CSH01 0021).jpg 4,480 × 6,720; 18 MB
-
 Artemis III Orion Crew Module (KSC-20230622-PH-CSH01 0026).jpg 6,720 × 4,480; 18.99 MB
-
 Artemis III Orion Crew Module (KSC-20230622-PH-CSH01 0029).jpg 6,632 × 4,421; 16.25 MB
-
 Artemis III Pressure Vessel Arrival, Lift to Work Stand (KSC-20211020-PH-GEB02 0005).jpg 6,720 × 4,480; 20.74 MB
-
 Artemis III Pressure Vessel Arrival, Lift to Work Stand (KSC-20211020-PH-GEB02 0014).jpg 6,720 × 4,480; 22.36 MB
-
 Artemis III Pressure Vessel Arrival, Lift to Work Stand.jpg 4,480 × 6,720; 18.98 MB
-
-

-
-

-
 ASRC AVCOAT.jpg 5,851 × 3,675; 13.21 MB
-
 ASTP backup crew.jpg 985 × 647; 109 KB
-
 ASTP crew six months before launch.jpg 985 × 723; 98 KB
-
 Astronaut Alan B. Shepard Jr., commander Apollo 14, undergoes suiting up.jpg 3,179 × 4,610; 2.56 MB
-
 Astronaut Alan Shepard suit-up for launch of the Apollo 14 mission.jpg 2,025 × 1,422; 715 KB
-
 Astronaut Anna Fisher visits Operations and Checkout building.jpg 5,616 × 3,744; 3.34 MB
-
 Astronaut Charles Conrad is Suited Up.jpg 6,856 × 4,766; 4.14 MB
-
 Astronaut Charlie Duke suit-up for launch of the Apollo 16 mission.jpg 1,796 × 1,208; 370 KB
-
 Astronaut Edgar Mitchell suit-up for launch of the Apollo 14 mission.jpg 862 × 1,276; 364 KB
-
 Astronaut Paul Weitz is Suited Up.jpg 4,506 × 3,129; 2.02 MB
-
 Barack Obama Speech at KSC.jpg 670 × 378; 140 KB
-
 Behnken suiting up.jpg 2,008 × 3,000; 533 KB
-
 Charlie Duke during a pressure integrity check during suit-up for launch.jpg 1,890 × 2,835; 1.39 MB
-
 Coverage of NASA Administrator Visit (KSC-20210727-PH-KLS01 0157).jpg 6,720 × 4,480; 18.08 MB
-
 Coverage of NASA Administrator Visit (KSC-20210727-PH-KLS01 0234).jpg 4,480 × 6,720; 20.05 MB
-
 Coverage of NASA Administrator Visit (KSC-20210727-PH-KLS01 0253).jpg 6,720 × 4,480; 18.89 MB
-
 Crane Replacement in O&C Highbay (KSC-20210303-PH-KLS01 0002).jpg 6,720 × 4,480; 19.72 MB
-
 Crane Replacement in O&C Highbay (KSC-20210310-PH-KLS01 0012).jpg 4,480 × 6,720; 22.7 MB
-
 Crane Replacement in O&C Highbay (KSC-20210310-PH-KLS01 0028).jpg 6,720 × 4,480; 22.82 MB
-
 Crane Replacement in O&C Highbay (KSC-20210315-PH-KLS01 0002).jpg 4,480 × 6,720; 22.81 MB
-
 Crane Replacement in O&C Highbay (KSC-20210315-PH-KLS01 0032).jpg 4,480 × 6,720; 23.06 MB
-
 Crane Replacement in O&C Highbay (KSC-20210317-PH-KLS01 0008).jpg 6,720 × 4,480; 18.76 MB
-
 Deke Slayton Suits Up - GPN-2000-000993.jpg 1,332 × 2,719; 1.82 MB
-
 Dekeslayton.jpg 3,000 × 3,000; 4.34 MB
-
Demo-2 Crew Members Suit Up for Flight to International Space Station GmhXNvzzJLw.webm 49 s, 1,280 × 720; 13.78 MB
-
 Demo-2-suitup-6b.jpg 1,280 × 720; 525 KB
-

-
 Douglas Hurley suiting up.jpg 6,720 × 4,480; 15.65 MB
-
 Ed Mitchell adjusts his watch Ap14-KSC-71P-88.jpg 750 × 947; 140 KB
-
 Ed Mitchell and Al Shepard suited up for altitude tests Ap14-S70-19764HR.jpg 2,361 × 2,388; 782 KB
-
-
 EDS Solar White Coating (KSC-20210331-PH-ILW01 0062).jpg 6,720 × 4,480; 19.39 MB
-
 EFT-1 Orion back shell tile installation.jpg 2,000 × 3,000; 4.41 MB
-
 EFT-1 Orion Weight and Center of Gravity Test.jpg 1,000 × 662; 382 KB
-
 ESA Director General Visits KSC (KSC-20211029-PH-CSH03 0033).jpg 5,618 × 3,840; 15.29 MB
-
 Final checkout of Apollo 11 Lunar Module (48275159806).jpg 5,481 × 3,421; 14.01 MB
-
 GEMINI REVIEW - MISC. - CAPE.jpg 2,816 × 4,224; 1.69 MB
-
-
 Interior of operations and checkout building, August 1965.jpg 563 × 449; 30 KB
-
 ISS S0 truss in O&C.jpg 2,617 × 1,698; 1.1 MB
-
 ISS US lab overhead crane.jpg 1,733 × 2,670; 1.02 MB
-
 ISS US lab.jpg 1,754 × 2,670; 1.12 MB
-
 Jack Swigert during suit-up.jpg 538 × 750; 76 KB
-
 Jack Swigert suits-up.jpg 750 × 533; 88 KB
-
 Jim Lovell during suit-up on launch day.jpg 3,204 × 4,659; 2.12 MB
-
 Jim Lovell during suit-up.jpg 1,834 × 2,835; 718 KB
-
 Jim Lovell leads Fred Haise and Jack Swigert to the transfer van.jpg 790 × 585; 85 KB
-
 Joe Kerwin suits up for Skylab 2 mission.jpg 2,008 × 2,835; 1.43 MB
-
 John Blaha and wife.jpg 1,542 × 2,272; 372 KB
-
 John Blaha with wife and daughter 2.jpg 2,265 × 1,520; 376 KB
-
 John Blaha with wife and daughter.jpg 2,276 × 1,522; 389 KB
-
 Jones3436.jpg 787 × 917; 84 KB
-
 Ken Mattingly suiting-up for Apollo 16 mission.jpg 2,130 × 2,835; 1.24 MB
-
 Ken Mattingly suiting-up for Apollo 16.jpg 1,890 × 2,835; 1.03 MB
-
 KENNEDY SPACE CENTER Abashidze & Yurchikhin (2002) (cropped).jpg 926 × 1,016; 88 KB
-
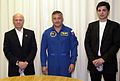 KENNEDY SPACE CENTER Abashidze & Yurchikhin (2002).jpg 3,000 × 2,023; 604 KB
-
 KSC Orion Media Day (KSC-20230808-PH-KLS01 0016).jpg 4,480 × 6,720; 19.61 MB
-
 KSC Orion Media Day (KSC-20230808-PH-KLS01 0026).jpg 6,644 × 4,429; 17.81 MB
-
 KSC Orion Media Day (KSC-20230808-PH-KLS01 0035).jpg 6,720 × 4,480; 19.15 MB
-
 KSC Orion Media Day (KSC-20230808-PH-KLS01 0055).jpg 6,720 × 4,480; 17.21 MB
-
 KSC Orion Media Day (KSC-20230808-PH-KLS01 0056).jpg 6,720 × 4,480; 17.48 MB
-
 KSC Orion Media Day (KSC-20230808-PH-KLS03 0042).jpg 6,720 × 4,480; 20.88 MB
-
 KSC Orion Media Day (KSC-20230808-PH-KLS03 0044).jpg 6,720 × 4,480; 21.62 MB
-
 KSC Orion Media Day (KSC-20230808-PH-KLS03 0058).jpg 6,720 × 4,480; 21.53 MB
-
 KSC Orion Media Day (KSC-20230808-PH-KLS03 0063).jpg 6,720 × 4,480; 17.19 MB
-
 KSC Orion Media Day (KSC-20230808-PH-KLS03 0080).jpg 6,720 × 4,480; 21.63 MB
-
 KSC Orion Media Day - Artemis II Crew (KSC-20230808-PH-KLS02 0005).jpg 4,102 × 6,216; 23.81 MB
-
 KSC Orion Media Day - Artemis II Crew (KSC-20230808-PH-KLS02 0023).jpg 3,968 × 6,040; 20.77 MB
-
 KSC Orion Media Day - Artemis II Crew (KSC-20230808-PH-KLS02 0030).jpg 3,766 × 5,797; 19.37 MB
-
 KSC Orion Media Day - Artemis II Crew (KSC-20230808-PH-KLS02 0033).jpg 4,480 × 6,720; 25.81 MB
-
 KSC Orion Media Day - Artemis II Crew (KSC-20230808-PH-KLS02 0035).jpg 6,720 × 4,480; 22.41 MB
-
 KSC Orion Media Day - Artemis II Crew (KSC-20230808-PH-KLS02 0037).jpg 4,480 × 6,720; 26.47 MB
-
 KSC Orion Media Day - Artemis II Crew (KSC-20230808-PH-KLS02 0040).jpg 6,720 × 4,480; 21.35 MB
-
 KSC Orion Media Day - Artemis II Crew (KSC-20230808-PH-KLS02 0041).jpg 4,480 × 6,720; 25.59 MB
-
 KSC Orion Media Day - Artemis II Crew (KSC-20230808-PH-KLS02 0044).jpg 6,720 × 4,480; 23.11 MB
-
 KSC Orion Media Day - Artemis II Crew (KSC-20230808-PH-KLS02 0047).jpg 4,480 × 6,720; 25.76 MB
-
 KSC Orion Media Day - Artemis II Crew (KSC-20230808-PH-KLS02 0050).jpg 6,720 × 4,480; 21.41 MB
-
 KSC Orion Media Day - Artemis II Crew (KSC-20230808-PH-KLS02 0078).jpg 6,659 × 4,439; 18.14 MB
-
 KSC Orion Media Day - Artemis II Crew (KSC-20230808-PH-KLS02 0086).jpg 6,720 × 4,480; 21.49 MB
-
 KSC Orion Media Day - Artemis II Crew (KSC-20230808-PH-KLS02 0087).jpg 6,720 × 4,480; 23.83 MB
-
 KSC Orion Media Day - Artemis II Crew (KSC-20230808-PH-KLS02 0093).jpg 6,720 × 4,480; 21.62 MB
-
 KSC Orion Media Day - Artemis II Crew (KSC-20230808-PH-KLS02 0098).jpg 6,720 × 4,480; 24.77 MB
-
 KSC speech with Orion - Dragon - CST-100.jpg 3,000 × 2,000; 3.77 MB
-
 KSC-2014-4320 Astronaut Anna Fisher visits Operations and Checkout building.jpg 2,000 × 3,000; 907 KB
-
 KSC-20160201-PH KLS0002 0134 (24684966391).jpg 3,000 × 2,000; 3.74 MB
-
 KSC-20160201-PH KLS0002 0139 (24684965821).jpg 3,000 × 2,000; 3.6 MB
-
 KSC-20160201-PH KLS0002 0145 (24150316164).jpg 3,000 × 2,000; 3.67 MB
-
 KSC-20160201-PH KLS0002 0153 (24778474065).jpg 3,000 × 2,000; 3.9 MB
-
 KSC-20160201-PH KLS0002 0161 (24151678553).jpg 3,000 × 2,000; 3.78 MB
-
 KSC-20160201-PH KLS0002 0182 (24778541505).jpg 3,000 × 2,000; 3.76 MB
-
 KSC-20160201-PH KLS0002 0185 (24151677143).jpg 3,000 × 2,000; 3.84 MB
-
 KSC-20160201-PH KLS0002 0188 (24660720022).jpg 3,000 × 2,000; 3.51 MB
-
 KSC-20160201-PH KLS0002 0191 (24150380984).jpg 3,000 × 2,000; 3.59 MB
-
 KSC-20160201-PH KLS0002 0195 (24150380394).jpg 3,000 × 2,000; 3.89 MB
-
 KSC-20160201-PH KLS0002 0201 (24778592885).jpg 3,000 × 2,000; 3.73 MB
-
 KSC-20160201-PH KLS0002 0202 (24410920799).jpg 3,000 × 2,000; 3.43 MB


-7_in_the_Kennedy_Space_Center%27s_Manned_Spacecraft_Operations_Building.jpg)


.jpg)


.jpg)

.jpg)
.jpg)
.jpg)
.jpg)
.jpg)


.jpg)
.jpg)
.jpg)

.jpg)
.jpg)
.jpg)
.jpg)
.jpg)
.jpg)
.jpg)
.jpg)
.jpg)
.jpg)
.jpeg)
.jpeg)
.jpeg)
.jpeg)
.jpeg)
.jpeg)
.jpeg)
.jpeg)
.jpg)
.jpg)
.jpg)
.jpg)

.jpg)
.jpg)
.jpg)

.jpg)
.jpg)
.jpg)
.jpg)
.jpg)
.jpg)
.jpg)
.jpg)
.jpg)
.jpg)
.jpg)
.jpg)
.jpg)
.jpg)
.jpg)
.jpg)
.jpg)
.jpg)
.jpg)
.jpg)
.jpg)
.jpg)
.jpg)
.jpg)
.jpg)
.jpg)
.jpg)
.jpg)
.jpg)
.jpg)

.jpeg)
.jpeg)
.jpeg)
.jpeg)


.jpg)
.jpg)
.jpg)
.jpg)
.jpg)
.jpg)
.jpg)
.jpg)
.jpg)


.jpg)


.jpg)
.jpg)

_(cropped).jpg)


_(cropped).jpg)
.jpg)
.jpg)
.jpg)
.jpg)
.jpg)
.jpg)
.jpg)
.jpg)
.jpg)
.jpg)
.jpg)
.jpg)
.jpg)
.jpg)
.jpg)
.jpg)
.jpg)
.jpg)
.jpg)
.jpg)
.jpg)
.jpg)
.jpg)
.jpg)
.jpg)
.jpg)
.jpg)


.jpg)
.jpg)
.jpg)
.jpg)
.jpg)
.jpg)
.jpg)
.jpg)
.jpg)
.jpg)
.jpg)
.jpg)