Category:Admiralty Charts Region I: Eastern Indian Ocean Gulf of Thailand Sumatra Malaya approaches to Singapore
Jump to navigation
Jump to search
Media in category "Admiralty Charts Region I: Eastern Indian Ocean Gulf of Thailand Sumatra Malaya approaches to Singapore"
The following 97 files are in this category, out of 97 total.
-
 Admiralty Chart No 1312 Singapore Strait to Borneo (southern sheet), Published 1968.jpg 13,829 × 8,442; 24.33 MB
-
 Admiralty Chart No 1348 Kepulauan Natuna, Published 1968.jpg 11,257 × 18,470; 34.78 MB
-
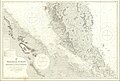
 Admiralty Chart No 1353 Diamond Point to One Fathom Bank, Published 1952.jpg 16,312 × 11,144; 26.3 MB
-
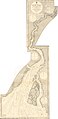
 Admiralty Chart No 1353 Diamond Point to Pulo Barhala, Published 1897.jpg 7,913 × 10,902; 30.09 MB
-
-
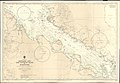 Admiralty Chart No 1358 Pandang and One Fathom Bank to Singapore, Published 1969.jpg 16,282 × 11,273; 30.54 MB
-

-
 Admiralty Chart No 136 River Hooghly Saugor Roads to Calcutta, Published 1950, New Edition 1960.jpg 11,092 × 16,323; 66.61 MB
-
 Admiralty Chart No 136 River Hugli, Published 1905 (composite).jpg 12,843 × 26,407; 78.68 MB
-
 Admiralty Chart No 136 River Hugli, Published 1905.jpg 10,905 × 16,243; 73.55 MB
-
 Admiralty Chart No 1376 Approaches to Tumpat, Published 1949.jpg 11,223 × 8,341; 25.5 MB
-
 Admiralty Chart No 1425 Gopalpur to False Point, Published 1890.jpg 16,288 × 11,083; 52.91 MB
-
 Admiralty Chart No 1789 Channels between Sumatra Linga and Singkep, Published 1904.jpg 16,084 × 11,279; 51.97 MB
-
 Admiralty Chart No 1884 Arakan River, Published 1848, Large Corrections 1884.jpg 10,960 × 15,949; 22.63 MB
-
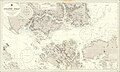
 Admiralty Chart No 1885 Akyab Harbour Surveyed 1945.jpg 8,373 × 12,233; 10.84 MB
-
 Admiralty Chart No 2031 Ceylon East Coast, Published 1888, Large Corrections 1947.jpg 11,124 × 16,323; 56.06 MB
-

-
 Admiralty Chart No 2056 Straat Sunda and Approaches, Published 1956.jpg 17,632 × 11,223; 25.36 MB
-
 Admiralty Chart No 212 Koninginne Bay and Padang Road, Published 1894.jpg 8,148 × 10,910; 30.76 MB
-
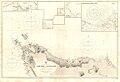
 Admiralty Chart No 2140 Plans in Natuna Kepulauan, Published 1963.jpg 16,307 × 11,059; 43.15 MB
-
 Admiralty Chart No 2149 Straat Banka and Gaspar Strait, Published 1945.jpg 11,064 × 16,203; 28.69 MB
-
 Admiralty Chart No 219 Achin Head to Diamond Point, Published 1877, Large Corrections 1906.jpg 15,901 × 10,882; 44.5 MB
-

-
 Admiralty Chart No 2403 Singapore Strait, Published 1936.jpg 27,521 × 16,456; 90.34 MB
-

-

-
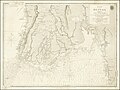
 Admiralty Chart No 2414 Gulf of Siam, Published 1855, Corrections to 1858.jpg 3,778 × 5,000; 4.43 MB
-
 Admiralty Chart No 2597 China Sea Banka Strait, Published 1858, Corrections to 1893.jpg 5,371 × 7,800; 12.22 MB
-
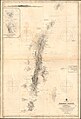
 Admiralty Chart No 2757 China Sea. Banka Strait to Singapore, Published 1861.jpg 8,052 × 11,837; 19.96 MB
-
 Admiralty Chart No 2760 Sumatra West Coast Sheet I from Achin Head to Chingkuk Bay, Published 1860.jpg 11,133 × 16,169; 50.06 MB
-

-
-
 Admiralty Chart No 2898 Maldive Islands to Ceylon, Published 1944.jpg 16,304 × 11,072; 32.56 MB
-
 Admiralty Chart No 2986 Port Cornwallis, Published 1897, Large Corrections 1965.jpg 8,325 × 11,225; 28.68 MB
-
 Admiralty Chart No 3046 Bay of Bengal Hastings Harbour and Approaches, Published 1961.jpg 11,135 × 16,407; 48.62 MB
-
 Admiralty Chart No 3265 Ceylon south coast Galle to Little Basses, Published 1910.jpg 20,158 × 11,588; 76.08 MB
-
 Admiralty Chart No 3471 Banka Strait, Published 1942.jpg 16,157 × 11,051; 48.75 MB
-
 Admiralty Chart No 3700 Colombo to Galle, Published 1960.jpg 11,179 × 16,333; 41.82 MB
-
 Admiralty Chart No 3730 Plans on south coast of Ceylon Weligama Bay, Hambantota, Published 1909.jpg 16,733 × 12,179; 58.33 MB
-
 Admiralty Chart No 3732 Penang Harbour, Published 1909.jpg 12,238 × 16,565; 79 MB
-
 Admiralty Chart No 3833 Singapore Strait, Published 1930.jpg 23,445 × 11,282; 58.5 MB
-
 Admiralty Chart No 3834 China Sea Singapore Strait Eastern Portion, Published 1927.jpg 8,000 × 3,713; 6.3 MB
-
 Admiralty Chart No 3837 Western Approaches to Singapore, Published 1927.jpg 11,066 × 16,298; 40 MB
-
 Admiralty Chart No 3838 Eastern Approaches to Singapore, Published 1927.jpg 10,976 × 16,143; 35 MB
-
 Admiralty Chart No 3839 Horsburgh Light to Jason Bay, Published 1927.jpg 13,620 × 11,225; 34.53 MB
-
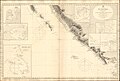
 Admiralty Chart No 3850 Banyak Islands, Published 1928.jpg 16,167 × 11,040; 45.49 MB
-
 Admiralty Chart No 3869 North West Part of Sumatra, Published 1930.jpg 11,101 × 16,269; 45.6 MB
-
 Admiralty Chart No 3985 Ko Kut to Non Khoai, Published 1958.jpg 11,141 × 16,255; 51.3 MB
-
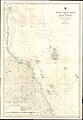
 Admiralty Chart No 575 Madras to Ramapatnam, Published 1895, New Edition 1918.jpg 10,889 × 16,160; 55 MB
-
 Admiralty Chart No 67 Tuticorin, Published 1881.jpg 8,112 × 10,875; 25.12 MB
-
 Admiralty Chart No 68b Palk Strait and Gulf of Mannar, Published 1862, New Edition 1935.jpg 18,351 × 11,208; 46.07 MB
-
 Admiralty Chart No 70 Bay of Bengal, Published 1967.jpg 16,364 × 11,235; 29.19 MB
-
 Admiralty Chart No 71 Madras to Calimere Point, Published 1902.jpg 10,738 × 17,603; 63.97 MB
-
 Admiralty Chart No 769 Sungei Sedili Besar to Kuala Pahang, Published 1949, New Edition 1960.jpg 11,291 × 16,355; 32.61 MB
-
 Admiralty Chart No 793 Butang Group to Pulau Berhala, Published 1896.jpg 13,214 × 18,851; 35.3 MB
-
 Admiralty Chart No 794 Pulo Berhala to Cape Rachado, Published 1895.jpg 15,994 × 12,860; 40.77 MB
-
 Admiralty Chart No 795 Cape Rachado to Singapore, Published 1896.jpg 18,457 × 11,363; 51.19 MB
-
 Admiralty Chart No 813 Ceylon South Coast, Published 1853, Large Corrections 1896.jpg 16,033 × 10,847; 59.39 MB
-
 Admiralty Chart No 813 Ceylon South Part, Published 1911.jpg 16,259 × 10,952; 60.14 MB
-

-

-
 Admiralty Chart No 816 Trincomali Harbour, Published 1908, Large Corrections 1955.jpg 11,124 × 16,223; 51.94 MB
-
 Admiralty Chart No 819 Galle Harbour, Published 1908.jpg 10,891 × 16,194; 63.82 MB
-

-
-
 Admiralty Chart No 825 Andaman Islands, Published 1891.jpg 10,878 × 16,031; 46.86 MB
-
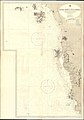
 Admiralty Chart No 828 Cape Comorin to Cocanada, Published 1877, Large Corrections 1898.jpg 10,883 × 16,231; 64.12 MB
-

-
 Admiralty Chart No 837 North East Harbour on the Grand Andaman Island, Published 1795.jpg 6,178 × 4,168; 2.16 MB
-
 Admiralty Chart No 840 Nicobar Islands, Published 1872, Large Corrections 1933.jpg 8,230 × 11,065; 26.81 MB
-
-

-
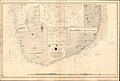
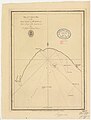
 Admiralty Chart No 855 (star) Tappanooly Harbour, Published 1795.jpg 8,352 × 6,206; 9.04 MB
-
 Admiralty Chart No 855 Seleaga Bay, Published 1774.jpg 3,116 × 4,124; 1.92 MB
-
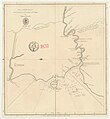
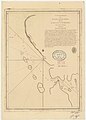
 Admiralty Chart No 856 Mansillar Harbour, near Sumatra, with a View, Published 1793.jpg 5,132 × 4,038; 3.55 MB
-
 Admiralty Chart No 857 Pulo Nayas, Published 1780.jpg 4,090 × 4,028; 2.5 MB
-
 Admiralty Chart No 859 Ayer-Bongi, Published 1774.jpg 3,084 × 4,152; 1.9 MB
-
 Admiralty Chart No 860 Priaman and the Ticoo Islands, Published 1774.jpg 3,022 × 4,176; 2.05 MB
-

-
 Admiralty Chart No 864 The Passage between the Islands of Great Fortune, Published 1786.jpg 2,960 × 4,146; 2.07 MB
-

-

-

-
 Admiralty Chart No 871 Cawoor or Sambat, Published 1774.jpg 3,056 × 4,110; 1.93 MB
-
 Admiralty Chart No 874 Bencoonat Bay, Published 1774.jpg 3,418 × 4,034; 2.44 MB
-
 Admiralty Chart No 875 Billimbing Bay, Published 1774.jpg 2,964 × 4,204; 2.04 MB
-
-
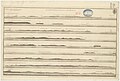
 Admiralty Chart No 878 Views of islands off the west coast of Sumatra, Published 1782.jpg 8,060 × 4,104; 5.87 MB
-

-

-
 Admiralty Chart No 882 Zutphen or Hound Islands, Published 1774.jpg 2,972 × 4,058; 1.99 MB
-

-
 Admiralty Chart No 986 Approaches to Ao Udom, Published 1964.jpg 16,180 × 11,071; 43.54 MB
-
 Admiralty Chart No 997 Blair's Harbour, Published 1793.jpg 4,800 × 3,922; 2.78 MB
-
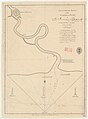 Admiralty Chart No 999 Menam River, Siam, Published 1797.jpg 2,950 × 3,996; 2.01 MB
-
 Approaches to Galle Harbour Cropped from Admiralty Chart No 819 Galle Harbour, Published 1908.jpg 10,191 × 8,334; 32.18 MB
-
 Galle Harbour Cropped from Admiralty Chart No 819 Galle Harbour, Published 1908.jpg 10,178 × 7,255; 26.46 MB
,_Published_1968.jpg)


.jpg)

.jpg)


_Tappanooly_Harbour,_Published_1795.jpg)


